结构型设计模式
7种结构型设计模式示例记录
1. 背景
通过示例(C++)加强对设计模式的体感。
2. 23种设计模式简要说明
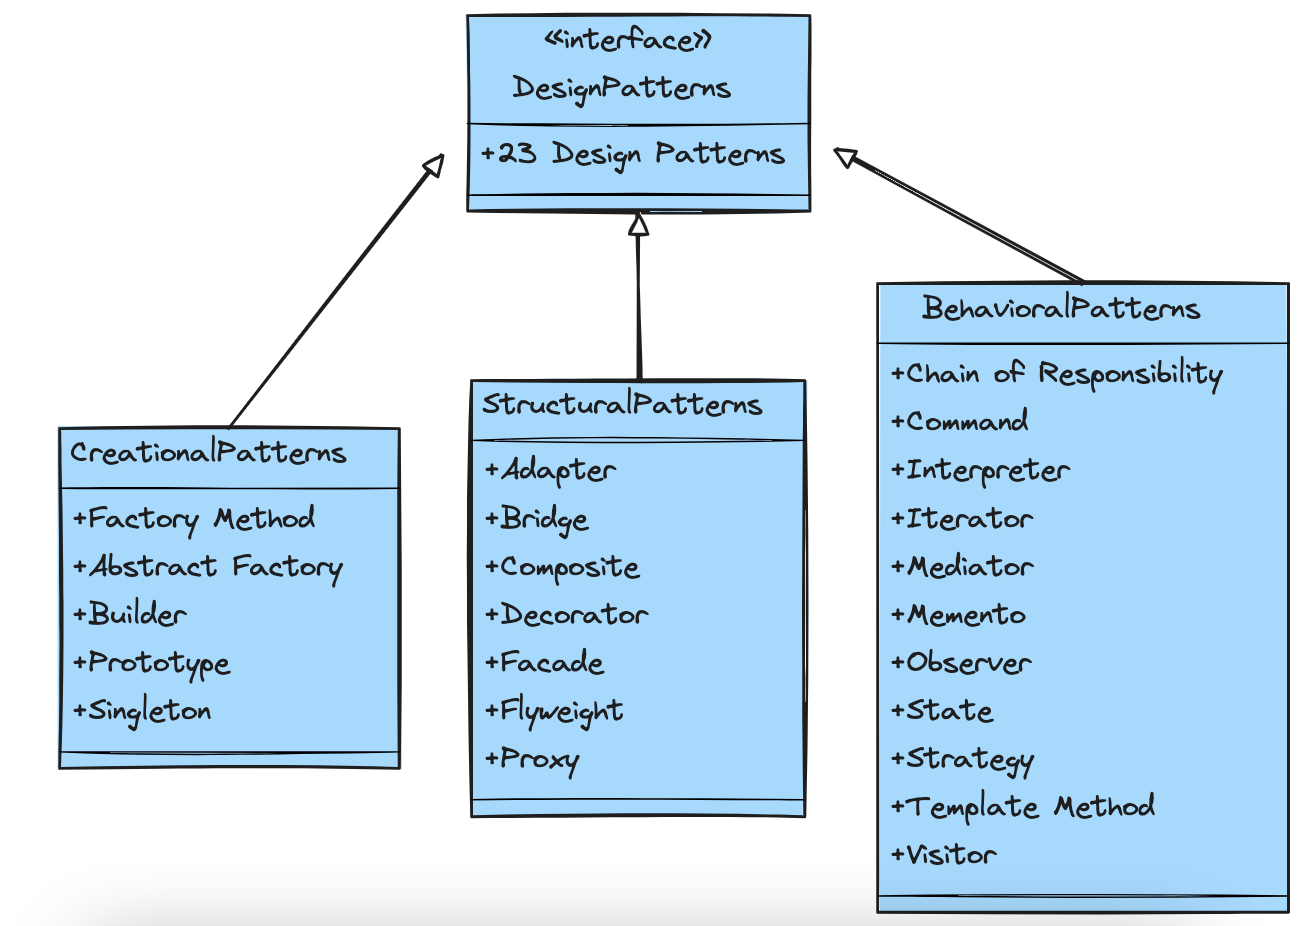
这里说明7种结构型设计模式
- 适配器模式(Adapter)
- 桥接模式(Bridge)
- 组合模式(Composite)
- 装饰器模式(Decorator)
- 外观模式(Facade)
- 享元模式(Flyweight)
- 代理模式(Proxy)
3. 适配器模式(Adaptor Pattern)
适配器模式(Adapter Pattern)是一种结构型设计模式,它允许一个类的接口与另一个类的接口不兼容的客户端代码协同工作。适配器模式通常用于将一个类的接口转换成客户端所期望的另一个接口形式,使得原本由于接口不兼容而无法协同工作的类能够一起工作。
示例:
假设我们有一个旧的音频播放器(OldAudioPlayer),它有一个playVhs()方法用于播放VHS格式的磁带。现在,我们想要使用它来播放DVD,但是DVD的格式与VHS不同,所以我们需要一个适配器(AudioAdapter)来转换DVD为VHS格式
1
2
3
4
5
6
7
8
9
10
11
12
13
14
15
16
17
18
19
20
21
22
23
24
25
26
27
28
29
30
31
32
33
34
35
36
37
38
39
40
41
42
43
44
45
46
47
48
49
50
51
52
53
54
55
56
57
58
59
60
61
62
63
64
65
66
67
#include <iostream>
#include <string>

// DVD接口
class DVD {
public:
    virtual ~DVD() {}
    virtual void play() = 0;
};

// DVD实现
class DvdPlayer : public DVD {
public:
    void play() override {
        std::cout << "Playing DVD..." << std::endl;
    }
};

// 旧的音频播放器接口(只接受VHS格式)
class AudioPlayer {
public:
    virtual ~AudioPlayer() {}
    virtual void play(const std::string& mediaType) = 0;
};

// 旧的音频播放器实现
class OldAudioPlayer : public AudioPlayer {
public:
    void play(const std::string& mediaType) override {
        if (mediaType == "vhs") {
            std::cout << "Playing VHS tape: " << mediaType << std::endl;
        } else {
            std::cout << "Unsupported media type: " << mediaType << std::endl;
        }
    }
};

// 定义适配器,它实现了AudioPlayer接口,但内部使用DVD播放器
// 适配器,将DVD播放器适配为AudioPlayer
class AudioAdapter : public AudioPlayer {
    DVD* dvdPlayer;
public:
    AudioAdapter(DVD* player) : dvdPlayer(player) {}

    void play(const std::string& mediaType) override {
        if (mediaType == "dvd") {
            dvdPlayer->play(); // 调用DVD播放器的play方法
            std::cout << "DVD is being played using the adapter" << std::endl;
        } else {
            std::cout << "Unsupported media type: " << mediaType << std::endl;
        }
    }
};

// 客户端代码使用适配器来播放DVD:
int main() {
    DvdPlayer* dvd = new DvdPlayer();
    AudioAdapter* adapter = new AudioAdapter(dvd);

    // 使用适配器播放DVD
    adapter->play("dvd");

    delete adapter;
    delete dvd;

    return 0;
}
g++ adaptor.cpp -o adaptor -std=c++11
4. 桥接模式(Bridge Pattern)
桥接模式(Bridge Pattern)是一种结构型设计模式,它将抽象部分与实现部分分离,使它们可以独立地变化。桥接模式通过将抽象与实现解耦,使得抽象和实现可以沿着各自的维度独立地变化。
在桥接模式中,通常包含以下四个角色:
抽象化(Abstraction):定义抽象类的接口,并保存一个对实现化对象的引用。
扩展抽象化(RefinedAbstraction):实现抽象化角色中的部分接口,并通过组合关系调用实现化角色中的业务方法。
实现化(Implementor):定义实现化角色的接口,该接口不一定要与抽象化角色的接口完全一致,事实上这两个接口可以完全不同。实现化角色应该给出具体的业务操作。
具体实现化(ConcreteImplementor):实现实现化角色接口,给出具体的业务操作。
以下是一个简单的C++示例,展示了桥接模式的应用:
1
2
3
4
5
6
7
8
9
10
11
12
13
14
15
16
17
18
19
20
21
22
23
24
25
26
27
28
29
30
31
32
33
34
35
36
37
38
39
40
41
42
43
44
45
46
47
48
49
50
51
52
53
54
55
56
57
58
59
60
61
62
63
64
65
66
67
68
69
70
71
72
73
#include <iostream>
#include <string>

// 实现化(Implementor)接口
class Implementor {
public:
    virtual ~Implementor() {}
    virtual void operationImpl() = 0;
};

// 具体实现化(ConcreteImplementor)
class ConcreteImplementorA : public Implementor {
public:
    void operationImpl() override {
        std::cout << "ConcreteImplementorA::operationImpl()" << std::endl;
    }
};

class ConcreteImplementorB : public Implementor {
public:
    void operationImpl() override {
        std::cout << "ConcreteImplementorB::operationImpl()" << std::endl;
    }
};

// 抽象化(Abstraction)接口
class Abstraction {
protected:
    Implementor* implementor;

public:
    Abstraction(Implementor* impl) : implementor(impl) {}
    virtual ~Abstraction() { delete implementor; }

    virtual void operation() {
        // 可以在这里添加一些额外的逻辑
        implementor->operationImpl();
    }
};

// 扩展抽象化(RefinedAbstraction)
class RefinedAbstraction : public Abstraction {
public:
    RefinedAbstraction(Implementor* impl) : Abstraction(impl) {}

    void operation() override {
        // 可以在这里添加一些RefinedAbstraction特有的逻辑
        std::cout << "RefinedAbstraction::operation() before..." << std::endl;
        Abstraction::operation(); // 调用实现化的操作
        std::cout << "RefinedAbstraction::operation() after..." << std::endl;
    }
};

// 客户端代码
int main() {
    // 创建实现化对象
    Implementor* implA = new ConcreteImplementorA();
    Implementor* implB = new ConcreteImplementorB();

    // 创建抽象化对象,并将实现化对象注入
    Abstraction* absA = new RefinedAbstraction(implA);
    Abstraction* absB = new RefinedAbstraction(implB);

    // 调用抽象化对象的方法,执行实现化对象的操作
    absA->operation();
    absB->operation();

    // 释放内存
    delete absA;
    delete absB;

    return 0;
}
g++ bridge.cpp -o bridge -std=c++11
在这个示例中,Implementor是实现化接口,ConcreteImplementorA和ConcreteImplementorB是具体的实现化类,它们分别实现了operationImpl方法。Abstraction是抽象化接口,它持有一个指向Implementor的指针,并在operation方法中调用实现化的操作。RefinedAbstraction是扩展抽象化类,它继承了Abstraction,并在operation方法中添加了额外的逻辑。客户端代码创建实现化对象和抽象化对象,并将实现化对象注入到抽象化对象中,然后调用抽象化对象的方法来执行实现化对象的操作。这样,抽象化部分和实现化部分就可以独立地变化了。
5. 组合模式(Composite Pattern)
组合模式(Composite Pattern)是一种结构型设计模式,它允许你将对象组合成树形结构来表示“部分-整体”的层次结构。组合模式使得客户端对单个对象和组合对象的使用具有一致性。在组合模式中,组合对象(Composite)和叶子对象(Leaf)实现了相同的接口,这使得客户端可以一致地处理它们。
以下是一个简单的C++示例,展示了如何使用组合模式来表示文件夹和文件的层次结构:
1
2
3
4
5
6
7
8
9
10
11
12
13
14
15
16
17
18
19
20
21
22
23
24
25
26
27
28
29
30
31
32
33
34
35
36
37
38
39
40
41
42
43
44
45
46
47
48
49
50
51
52
53
54
55
56
57
58
59
60
61
62
63
64
65
66
67
68
69
70
71
72
73
74
75
76
77
78
79
80
81
82
83
84
85
86
87
88
#include <iostream>
#include <vector>
#include <string>

// 抽象组件接口
class Component {
public:
    virtual ~Component() {}
    virtual void add(Component* component) = 0; // 添加子组件
    virtual void remove(Component* component) = 0; // 移除子组件
    virtual void display(int depth) = 0; // 显示组件信息,depth 表示缩进级别
};

// 叶子组件:文件
class File : public Component {
private:
    std::string name;
public:
    File(const std::string& name) : name(name) {}

    void add(Component* /*component*/) override {
        std::cout << "Cannot add to a file." << std::endl;
    }

    void remove(Component* /*component*/) override {
        std::cout << "Cannot remove from a file." << std::endl;
    }

    void display(int depth) override {
        for (int i = 0; i < depth; ++i) {
            std::cout << "--";
        }
        std::cout << name << std::endl;
    }
};

// 组合组件:文件夹
class Directory : public Component {
private:
    std::string name;
    std::vector<Component*> children;
public:
    Directory(const std::string& name) : name(name) {}

    void add(Component* component) override {
        children.push_back(component);
    }

    void remove(Component* component) override {
        auto it = std::find(children.begin(), children.end(), component);
        if (it != children.end()) {
            children.erase(it);
        } else {
            std::cout << "Component not found." << std::endl;
        }
    }

    void display(int depth) override {
        for (int i = 0; i < depth; ++i) {
            std::cout << "--";
        }
        std::cout << name << "/" << std::endl;

        for (Component* child : children) {
            child->display(depth + 1);
        }
    }
};

// 客户端代码
int main() {
    Directory* root = new Directory("root");
    Directory* dir1 = new Directory("dir1");
    Directory* dir2 = new Directory("dir2");
    File* file1 = new File("file1.txt");
    File* file2 = new File("file2.txt");

    root->add(dir1);
    root->add(dir2);
    dir1->add(file1);
    dir2->add(file2);

    root->display(0); // 显示整个层次结构

    // 清理内存(略)

    return 0;
}
g++ composite.cpp -o composite -std=c++11
在这个例子中,Component 是抽象组件接口,定义了 add、remove 和 display 方法。File 是叶子组件,实现了 Component 接口,但它不允许添加或移除子组件。Directory 是组合组件,也实现了 Component 接口,但它允许添加和移除子组件(可以是 File 或 Directory)。
main 函数中创建了一个简单的目录结构,并调用 display 方法来显示整个层次结构。注意,在这个示例中,我们没有处理内存释放(即没有删除分配的 Component 对象),这在实际应用中是很重要的。你可以使用智能指针(如 std::unique_ptr 或 std::shared_ptr)来自动管理内存。
6. 装饰器模式(Decorator Pattern)
装饰器模式(Decorator Pattern)是一种结构型设计模式,它允许用户通过动态地给一个对象添加一些额外的职责来扩展对象的功能。就增加功能来说,装饰器模式相比生成子类更为灵活。
装饰器模式的主要组件包括:
- 抽象组件(Component):定义了一个对象的接口,可以给这些对象动态地添加职责。
- 具体组件(ConcreteComponent):实现了抽象组件,并添加了一些业务逻辑。
- 装饰器(Decorator):持有一个指向抽象组件的引用,并实现了抽象组件的接口。装饰器可以向组件添加额外的职责。
- 具体装饰器(ConcreteDecorator):扩展了装饰器类,添加了具体的职责。
示例:假设我们有一个咖啡的抽象类(Component),以及一个具体的咖啡类(ConcreteComponent)。我们想要通过装饰器来增加额外的功能,比如加牛奶、加糖等。
1
2
3
4
5
6
7
8
9
10
11
12
13
14
15
16
17
18
19
20
21
22
23
24
25
26
27
28
29
30
31
32
33
34
35
36
37
38
39
40
41
42
43
44
45
46
47
48
49
50
51
52
53
54
55
56
57
58
59
60
#include <iostream>
#include <string>
#include <memory> // 用于 std::shared_ptr

// 抽象组件:咖啡
class Coffee {
public:
    virtual ~Coffee() {}
    virtual std::string getDescription() const = 0;
    virtual double getCost() const = 0;
};

// 具体组件:美式咖啡
class AmericanCoffee : public Coffee {
public:
    std::string getDescription() const override { return "American Coffee"; }
    double getCost() const override { return 2.0; }
};

// 装饰器基类:抽象装饰器
class CoffeeDecorator : public Coffee {
protected:
    std::shared_ptr<Coffee> coffee;

public:
    CoffeeDecorator(std::shared_ptr<Coffee> coffee) : coffee(coffee) {}

    std::string getDescription() const override { return coffee->getDescription(); }
    double getCost() const override { return coffee->getCost(); }
};

// 具体装饰器:加牛奶的咖啡
class MilkCoffee : public CoffeeDecorator {
public:
    MilkCoffee(std::shared_ptr<Coffee> coffee) : CoffeeDecorator(coffee) {}
    std::string getDescription() const override { return CoffeeDecorator::getDescription() + ", Milk"; }
    double getCost() const override { return CoffeeDecorator::getCost() + 0.5; }
};

// 具体装饰器:加糖的咖啡
class SugarCoffee : public CoffeeDecorator {
public:
    SugarCoffee(std::shared_ptr<Coffee> coffee) : CoffeeDecorator(coffee) {}
    std::string getDescription() const override { return CoffeeDecorator::getDescription() + ", Sugar"; }
    double getCost() const override { return CoffeeDecorator::getCost() + 0.3; }
};

int main() {
    // 使用 std::make_shared 来创建具体组件对象,它会自动管理内存
    auto americanCoffee = std::make_shared<AmericanCoffee>();
    std::cout << americanCoffee->getDescription() << ": $" << americanCoffee->getCost() << std::endl;

    // 创建装饰器链,因为使用了 std::shared_ptr,所以不需要手动删除
    auto decoratedCoffee = std::make_shared<MilkCoffee>(std::make_shared<SugarCoffee>(americanCoffee));
    std::cout << decoratedCoffee->getDescription() << ": $" << decoratedCoffee->getCost() << std::endl;

    // 不需要手动删除 decoratedCoffee 或其内部的 shared_ptr,当引用计数为 0 时,它们会自动删除

    return 0;
}
g++ decorator.cpp -o decorator -std=c++11
在这个示例中,Coffee 是抽象组件,AmericanCoffee 是具体组件,CoffeeDecorator 是装饰器,而 MilkCoffee 和 SugarCoffee 是具体装饰器。我们可以通过动态地组合这些装饰器来创建具有不同功能和价格的咖啡。
7. 外观模式(Facade Pattern)
外观模式(Facade Pattern)是一种为子系统中的一组接口提供一个统一的、高层次的接口,使得子系统更加容易使用的设计模式。外观模式定义了一个高层接口,这个接口使得这一子系统更加容易使用。它隐藏了子系统的复杂性,并对外提供了一个简单的接口。
在 C++ 中,我们可以使用类来实现外观模式。以下是一个简单的示例,假设我们有一个复杂的子系统,该子系统包含多个类,但用户只需要一个简化的接口来与这些类交互。
1
2
3
4
5
6
7
8
9
10
11
12
13
14
15
16
17
18
19
20
21
22
23
24
25
26
27
28
29
30
31
32
33
34
35
36
37
38
39
40
41
42
43
44
45
46
47
48
49
50
#include <iostream>
#include <memory> // 用于 std::shared_ptr

// 子系统类
class SubSystemA {
public:
    void operationA() {
        std::cout << "Subsystem A: Operation A\n";
    }
};

class SubSystemB {
public:
    void operationB() {
        std::cout << "Subsystem B: Operation B\n";
    }
};

class SubSystemC {
public:
    void operationC() {
        std::cout << "Subsystem C: Operation C\n";
    }
};

// 外观类
class Facade {
private:
    std::shared_ptr<SubSystemA> subsystemA;
    std::shared_ptr<SubSystemB> subsystemB;
    std::shared_ptr<SubSystemC> subsystemC;

public:
    Facade() : subsystemA(std::make_shared<SubSystemA>()), subsystemB(std::make_shared<SubSystemB>()), subsystemC(std::make_shared<SubSystemC>()) {}

    // 提供一个简化的接口
    void performTask() {
        subsystemA->operationA();
        subsystemB->operationB();
        subsystemC->operationC();
    }
};

// 客户端代码
int main() {
    Facade facade;
    facade.performTask(); // 使用简化的接口完成一系列操作

    return 0;
}
g++ facade.cpp -o facade -std=c++11
在这个示例中,我们有三个子系统类 SubSystemA、SubSystemB 和 SubSystemC,每个类都有一个操作。然后,我们创建了一个 Facade 类,它持有了这三个子系统的实例,并提供了一个 performTask 方法,该方法按顺序调用了子系统的操作。
客户端代码只需要与 Facade 类交互,而不需要知道或管理子系统的细节。这样,就简化了客户端与子系统之间的交互,隐藏了子系统的复杂性。
8. 享元模式(Flyweight Pattern)
享元模式(Flyweight Pattern)是一种用于减少创建对象数量,从而减少内存使用和提高性能的设计模式。它通过使用共享对象来支持大量细粒度的对象。在享元模式中,通常会将对象的状态分为内部状态和外部状态,内部状态在享元对象中存储,并且在享元对象之间是共享的;而外部状态则由客户端存储和管理,享元对象可以访问它,但通常不会修改它。
以下是一个基于 C++11 的享元模式示例,我们将创建一个简单的文本渲染系统,其中文本的颜色是共享的(作为内部状态),而文本的内容则是由客户端提供的(作为外部状态):
1
2
3
4
5
6
7
8
9
10
11
12
13
14
15
16
17
18
19
20
21
22
23
24
25
26
27
28
29
30
31
32
33
34
35
36
37
38
39
40
41
42
43
44
45
46
47
48
49
50
51
52
53
54
55
56
57
58
59
60
61
#include <iostream>
#include <unordered_map>
#include <string>
#include <memory>

// 享元接口
class Flyweight {
public:
    virtual ~Flyweight() = default;
    virtual void operation(const std::string& externalState) = 0;
};

// 具体的享元实现
class ConcreteFlyweight : public Flyweight {
private:
    std::string intrinsicState; // 内部状态,例如颜色

public:
    ConcreteFlyweight(const std::string& state) : intrinsicState(state) {}

    void operation(const std::string& externalState) override {
        std::cout << "Displaying: " << intrinsicState << " text: " << externalState << std::endl;
    }
};

// 享元工厂
class FlyweightFactory {
private:
    std::unordered_map<std::string, std::shared_ptr<Flyweight>> flyweights;

public:
    std::shared_ptr<Flyweight> getFlyweight(const std::string& key) {
        auto it = flyweights.find(key);
        if (it == flyweights.end()) {
            // 如果不存在,则创建新的享元对象并存储
            it = flyweights.emplace(key, std::make_shared<ConcreteFlyweight>(key)).first;
        }
        return it->second;
    }
};

// 客户端使用享元
int main() {
    FlyweightFactory factory;

    // 获取不同颜色的享元对象
    std::shared_ptr<Flyweight> redFlyweight = factory.getFlyweight("Red");
    std::shared_ptr<Flyweight> blueFlyweight = factory.getFlyweight("Blue");

    // 使用享元对象进行操作
    redFlyweight->operation("Hello");
    blueFlyweight->operation("World");

    // 注意:如果再次请求红色享元,它应该已经被缓存并返回
    std::shared_ptr<Flyweight> redFlyweightAgain = factory.getFlyweight("Red");
    if (redFlyweight == redFlyweightAgain) {
        std::cout << "Red flyweight is reused." << std::endl;
    }

    return 0;
}
g++ flyweight.cpp -o flyweight -std=c++11
在这个示例中,我们定义了一个 Flyweight 接口,它有一个 operation 方法,用于根据外部状态进行操作。ConcreteFlyweight 类是 Flyweight 接口的具体实现,它包含一个内部状态(颜色)。FlyweightFactory 类是一个享元工厂,它负责创建和管理享元对象。我们使用 std::unordered_map 来存储已经创建的享元对象,以便在后续请求中重用它们。
在 main 函数中,我们演示了如何获取享元对象并使用它们进行操作。我们还展示了如果再次请求同一个内部状态的享元对象,它将被重用而不是重新创建。
9. 代理模式(Proxy Pattern)
代理模式(Proxy Pattern)是一种为其他对象提供一个代理以控制对这个对象的访问的设计模式。代理对象在客户端和目标对象之间起到中介的作用,用于控制对目标对象的访问,同时隐藏了目标对象的实现细节。代理模式常用于实现远程代理、虚拟代理、保护代理、智能引用等。
以下是一个简单的基于C++11的代理模式示例,其中我们将创建一个简单的接口和其实现,以及一个代理类,该代理类将控制对实现的访问:
1
2
3
4
5
6
7
8
9
10
11
12
13
14
15
16
17
18
19
20
21
22
23
24
25
26
27
28
29
30
31
32
33
34
35
36
37
38
39
40
41
42
43
44
45
#include <iostream>
#include <memory>

// 目标对象的接口
class Subject {
public:
    virtual ~Subject() = default;
    virtual void request() = 0;
};

// 目标对象的实现
class RealSubject : public Subject {
public:
    void request() override {
        std::cout << "RealSubject: Handling request." << std::endl;
    }
};

// 代理类
class Proxy : public Subject {
private:
    std::unique_ptr<RealSubject> realSubject; // 持有目标对象的指针

    // 可以在这里添加访问控制逻辑

public:
    Proxy() : realSubject(std::make_unique<RealSubject>()) {}

    void request() override {
        // 在这里可以添加额外的逻辑,如日志记录、权限检查等
        std::cout << "Proxy: Forwarding request to RealSubject." << std::endl;
        realSubject->request();
    }
};

// 客户端代码
int main() {
    // 创建一个代理对象
    std::unique_ptr<Subject> proxy = std::make_unique<Proxy>();

    // 客户端通过代理对象发送请求
    proxy->request();

    return 0;
}
g++ proxy.cpp -o proxy -std=c++14
在这个示例中,Subject 是目标对象的接口,RealSubject 是目标对象的实现,它实现了 request 方法。Proxy 是代理类,它实现了与目标对象相同的接口,并且内部持有一个 RealSubject 的智能指针。当客户端调用代理对象的 request 方法时,代理对象会执行一些额外的逻辑(在这个示例中仅仅是打印一条消息),然后将请求转发给目标对象。
这个示例展示了代理模式的基本结构:代理对象持有一个目标对象的引用,并控制对目标对象的访问。你可以根据需要在代理对象中添加更多的逻辑,如权限检查、日志记录、性能监控等。
10. 小结
1、通过示例介绍了7种结构型设计模式
11. 参考
1、GPT