LevelDB学习笔记(二) -- 读写操作流程
LevelDB学习笔记,本篇学习其读写操作流程。
1. 背景
LevelDB学习笔记(一) – 整体架构和基本操作里做了基本介绍和简单demo功能测试,本篇看下对应的读写实现流程。
说明:本博客作为个人学习实践笔记,可供参考但非系统教程,可能存在错误或遗漏,欢迎指正。若需系统学习,建议参考原链接。
2. UML类图
根据代码,画一下LevelDB相关类图,如下:
3. 写操作流程
LevelDB对外提供的写入接口有:(1)Put(2)Delete两种。
这两种本质对应同一种操作,Delete操作同样会被转换成一个value为空的Put操作。
如下可看到都是转换为WriteBatch批量写入,而后调用DBImpl::Write。
无论是Put/Del操作,还是批量操作,底层都会为这些操作创建一个batch实例作为一个数据库操作的最小执行单元,batch对应的操作是原子性的。
1
2
3
4
5
6
7
8
9
10
11
12
13
14
15
16
17
18
19
20
21
22
23
24
25
26
// db/db_impl.cc

// Put调用流程
Status DBImpl::Put(const WriteOptions& o, const Slice& key, const Slice& val) {
  return DB::Put(o, key, val);
}

// Default implementations of convenience methods that subclasses of DB
// can call if they wish
// 基类DB的接口默认实现,子类也可直接使用,或者重写
Status DB::Put(const WriteOptions& opt, const Slice& key, const Slice& value) {
  WriteBatch batch;
  batch.Put(key, value);
  return Write(opt, &batch);
}

// Delete调用流程也是 DBImpl::Delete -> DB::Delete -> WriteBatch -> Write
Status DBImpl::Delete(const WriteOptions& options, const Slice& key) {
  return DB::Delete(options, key);
}

Status DB::Delete(const WriteOptions& opt, const Slice& key) {
  WriteBatch batch;
  batch.Delete(key);
  return Write(opt, &batch);
}
3.1. WriteBatch
WriteBatch类中的成员变量只有一个:std::string rep_;。需要从这个看似简单的string成员来理解LevelDB的数据组织结构。
1
2
3
4
5
6
7
8
// include/leveldb/write_batch.h
class LEVELDB_EXPORT WriteBatch {
  ...
private:
  friend class WriteBatchInternal;

  std::string rep_;
}
在batch中,每一条数据项都按照上图格式进行编码。每条数据项编码后的第一位是这条数据项的类型(更新还是删除),之后是数据项key的长度,数据项key的内容;若该数据项不是删除操作,则再加上value的长度,value的内容。
上面的batch.Put(key, value)对应的函数定义:
1
2
3
4
5
6
7
8
9
10
11
12
// db/write_batch.cc
void WriteBatch::Put(const Slice& key, const Slice& value) {
  // 向WriteBatch实例计数加1,这里面的4字节计数会进行编码转换,计数位置从第8位开始(即跳过0-7位)
  WriteBatchInternal::SetCount(this, WriteBatchInternal::Count(this) + 1);
  // 串行新增一个字节(char),表示操作类型。只有两种取值:kTypeDeletion = 0x0, kTypeValue = 0x1,此处为`kTypeValue`类型
  rep_.push_back(static_cast<char>(kTypeValue));

  // 向rep_追加(append)key的长度和数据
  PutLengthPrefixedSlice(&rep_, key);
  // 向rep_追加(append)value的长度和数据
  PutLengthPrefixedSlice(&rep_, value);
}
Delete只会追加key的长度和数据
1
2
3
4
5
6
7
8
9
// db/write_batch.cc
void WriteBatch::Delete(const Slice& key) {
  // 向WriteBatch实例计数加1
  WriteBatchInternal::SetCount(this, WriteBatchInternal::Count(this) + 1);
  // 串行新增操作类型,此处为`kTypeDeletion`类型
  rep_.push_back(static_cast<char>(kTypeDeletion));
  // 只追加key的长度和数据
  PutLengthPrefixedSlice(&rep_, key);
}
3.2. DBImpl::Write
append追加对应的操作后,此处开始写入数据库。
里面很多内容值得好好学习一下:比如std::deque、LevelDB自己封装的MutexLock和port::CondVar、单例类模板、生产者/消费者模型、各种线程安全保护手段等等,也是个学习实践现代C++的机会,学习记录直接在 fork 的代码里添加注释。
先看下DBImpl::Writer这个类(DBImpl::Write函数里会用到)
1
2
3
4
5
6
7
8
9
10
11
struct DBImpl::Writer {
  explicit Writer(port::Mutex* mu)
      : batch(nullptr), sync(false), done(false), cv(mu) {}

  Status status;
  WriteBatch* batch;
  bool sync;
  bool done;
  // 封装了 std::condition_variable,添加了线程安全
  port::CondVar cv;
};
DBImpl::Write函数代码:
1
2
3
4
5
6
7
8
9
10
11
12
13
14
15
16
17
18
19
20
21
22
23
24
25
26
27
28
29
30
31
32
33
34
35
36
37
38
39
40
41
42
43
44
45
46
47
48
49
50
51
52
53
54
55
56
57
58
59
60
61
62
63
64
65
66
67
68
69
70
71
72
73
74
75
76
77
78
79
80
81
82
83
84
85
86
87
88
89
90
91
92
93
94
95
96
97
Status DBImpl::Write(const WriteOptions& options, WriteBatch* updates) {
  // 构造 Writer 实例
  Writer w(&mutex_);
  w.batch = updates;
  w.sync = options.sync;
  w.done = false;

  // 整体加锁,在同一个时刻,只允许一个写入操作将内容写入到日志文件以及内存数据库中
  // RAII特性,构造时lock,析构时unlock
  MutexLock l(&mutex_);
  // 要写入的数据,由Writer封装后先放到队列尾部
  // 这里的writers_是 std::deque 双端队列
  writers_.push_back(&w);
  // 有其他的写入操作,则等待
  while (!w.done && &w != writers_.front()) {
    // 线程安全地等待条件变量,直到被唤醒
    w.cv.Wait();
  }
  // 到这里说明被唤醒了
  // 继续判断,若其他线程设置 Writer已结束 则返回
  if (w.done) {
    return w.status;
  }

  // May temporarily unlock and wait.
  // 声明为:Status DBImpl::MakeRoomForWrite(bool force),updates为nullptr时压缩处理
  // 调用 MakeRoomForWrite 前必定已持锁,里面会断言判断
  Status status = MakeRoomForWrite(updates == nullptr);
  // VersionSet的最新序列号
  uint64_t last_sequence = versions_->LastSequence();
  // 待写入数据(封装在Writer中)
  Writer* last_writer = &w;
  // 有合并空间且有内容要写入时
  if (status.ok() && updates != nullptr) {  // nullptr batch is for compactions
    // 合并写操作,要合并的对象是 writers_ 对应的 Writer 双端队列
    // 都会合并到 tmp_batch_ 成员变量去,返回的指针实际也是 tmp_batch_(定义为WriteBatch* tmp_batch_)
    WriteBatch* write_batch = BuildBatchGroup(&last_writer);
    WriteBatchInternal::SetSequence(write_batch, last_sequence + 1);
    last_sequence += WriteBatchInternal::Count(write_batch);

    // Add to log and apply to memtable.  We can release the lock
    // during this phase since &w is currently responsible for logging
    // and protects against concurrent loggers and concurrent writes
    // into mem_.
    // 这里解锁是因为 w(类型为Writer) 中会进行并发控制。且下面操作可能涉及::write文件io,比较耗时
    {
      mutex_.Unlock();
      // 合并后的记录,写WAL预写日志
      // Contents获取WriteBatch里面的内容,多条记录按batch格式组织
      status = log_->AddRecord(WriteBatchInternal::Contents(write_batch));
      bool sync_error = false;
      if (status.ok() && options.sync) {
        status = logfile_->Sync();
        if (!status.ok()) {
          sync_error = true;
        }
      }
      if (status.ok()) {
        // 写memtable,write_batch写到传入的 mem_ 里
        status = WriteBatchInternal::InsertInto(write_batch, mem_);
      }
      mutex_.Lock();
      if (sync_error) {
        // The state of the log file is indeterminate: the log record we
        // just added may or may not show up when the DB is re-opened.
        // So we force the DB into a mode where all future writes fail.
        RecordBackgroundError(status);
      }
    }
    if (write_batch == tmp_batch_) tmp_batch_->Clear();

    versions_->SetLastSequence(last_sequence);
  }

  while (true) {
    // deque头
    Writer* ready = writers_.front();
    // 从deque弹出
    writers_.pop_front();
    // 如果队列头有其他待写入,依次通知写入(本次写入合并到了其后面)
    if (ready != &w) {
      ready->status = status;
      ready->done = true;
      // 通知唤醒一个线程
      ready->cv.Signal();
    }
    if (ready == last_writer) break;
  }

  // 最后是通知本次的写入。和上面逻辑差别是 status和done 的赋值
  // Notify new head of write queue
  if (!writers_.empty()) {
    writers_.front()->cv.Signal();
  }

  return status;
}
3.3. 流程图和代码对应
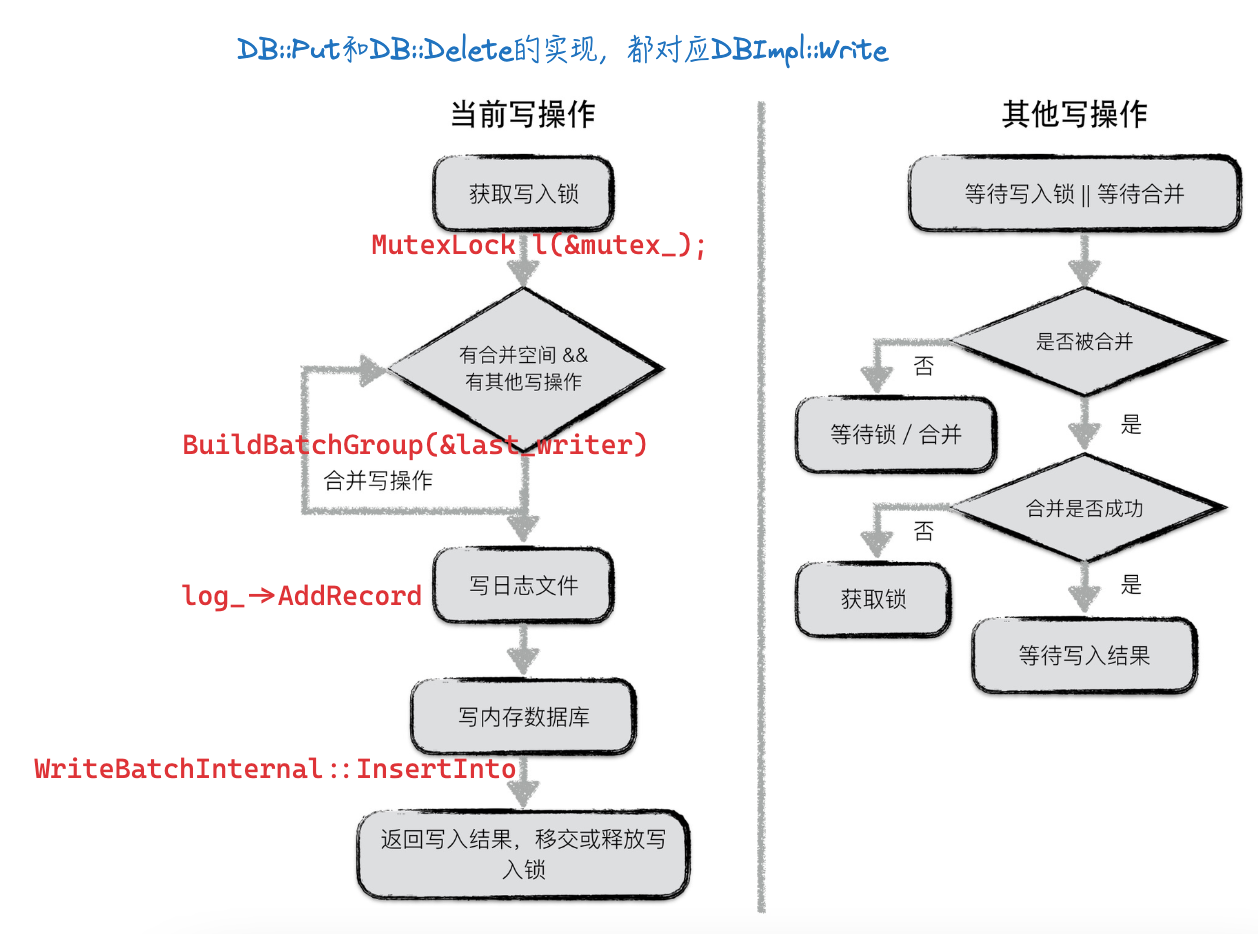
这里直接看下leveldb-handbook里的写入流程图,写入时会进行合并,自己加了点代码注释:
4. 读操作流程
涉及到VersionSet和Version类,见前面对应的类图。
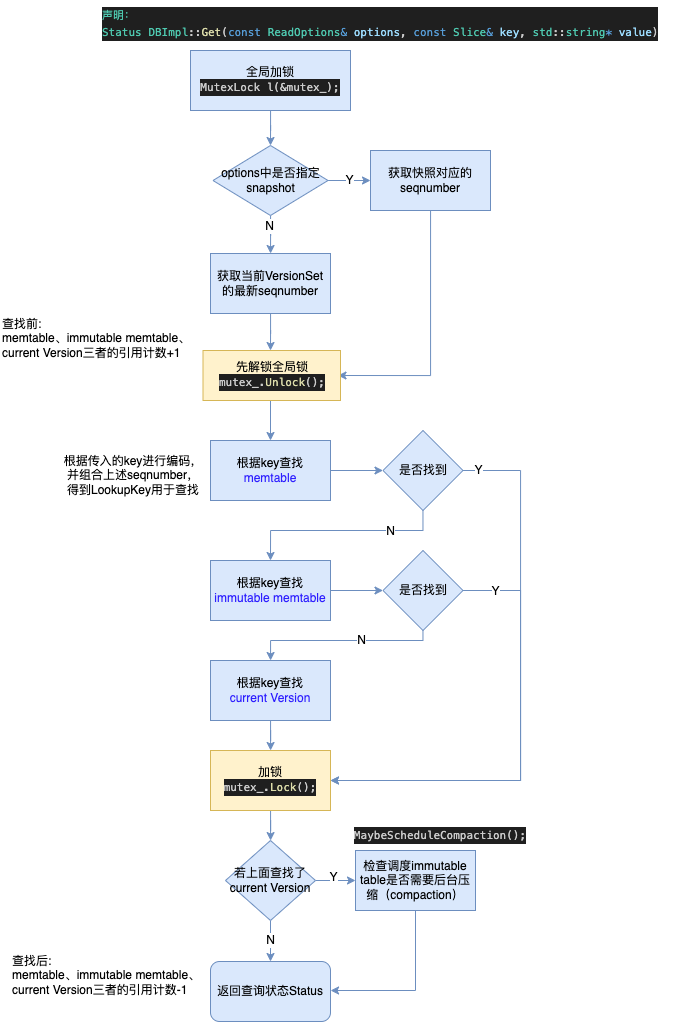
调用链:DB::Get -> DBImpl::Get,对应的读流程如下:
代码不长,下面贴一下。memtable、immutable memtable、current Version三者(实际前2个都是MemTable类型)的具体Get流程暂不展开。
1
2
3
4
5
6
7
8
9
10
11
12
13
14
15
16
17
18
19
20
21
22
23
24
25
26
27
28
29
30
31
32
33
34
35
36
37
38
39
40
41
42
43
44
45
46
47
48
49
50
51
52
53
54
55
56
57
58
59
60
61
62
63
64
65
66
// db/db_impl.cc
Status DBImpl::Get(const ReadOptions& options, const Slice& key,
                   std::string* value) {
  Status s;
  // RAII 加锁
  MutexLock l(&mutex_);
  SequenceNumber snapshot;
  if (options.snapshot != nullptr) {
    // 若option里传入了快照,获取快照对应的 seqnumber
    snapshot =
        static_cast<const SnapshotImpl*>(options.snapshot)->sequence_number();
  } else {
    // 非快照Get,则获取当前 VersionSet 对应的seqnumber
    snapshot = versions_->LastSequence();
  }

  // 当前数据库的 memtable
  MemTable* mem = mem_;
  // immutable memtable
  MemTable* imm = imm_;
  // VersionSet里当前使用的Version
  /*
    immutalbe memtable压缩持久化后得到 level0的sstable;
    levelN层的sstable压缩后得到levelN+1层的sstable
    每次压缩完成,就得到一个Version。Version创建规则:versionNew = versionOld + VersionEdit(VersionEdit记录相对上一个Version变化的内容)
  */
  Version* current = versions_->current();
  // memtable、immutable memtable、current Version里的引用计数都+1(下面结束时会都-1)
  mem->Ref();
  if (imm != nullptr) imm->Ref();
  current->Ref();

  bool have_stat_update = false;
  Version::GetStats stats;

  // Unlock while reading from files and memtables
  {
    // 从文件和memtable中读取时先解锁
    mutex_.Unlock();
    // First look in the memtable, then in the immutable memtable (if any).
    //构造一个查询key,会根据key+seqnumber+key类型 进行编码得到
    LookupKey lkey(key, snapshot);
    // 到memtable找key,传入key对应的seqnumber
    if (mem->Get(lkey, value, &s)) {
      // Done
    } else if (imm != nullptr && imm->Get(lkey, value, &s)) {  // 找不到则在immutalbe table里找
      // Done
    } else {
      // 上面都找不到则在current Version里找
      s = current->Get(options, lkey, value, &stats);
      // 状态直接更新为true?
      have_stat_update = true;
    }
    mutex_.Lock();
  }

  // 若上面查到current Version,且计数满足压缩条件,则检查调度进行压缩
  if (have_stat_update && current->UpdateStats(stats)) {
    MaybeScheduleCompaction();
  }
  // memtable、immutable memtable、Version里的引用计数都-1
  mem->Unref();
  if (imm != nullptr) imm->Unref();
  current->Unref();
  return s;
}
4.1. Version说明
再看下Version和manifest的关系。
compaction压缩操作包含:
- immutable memtable压缩为level0的sstable(minor compaction)
- levelN的sstable压缩为levelN+1的sstable (major compaction)
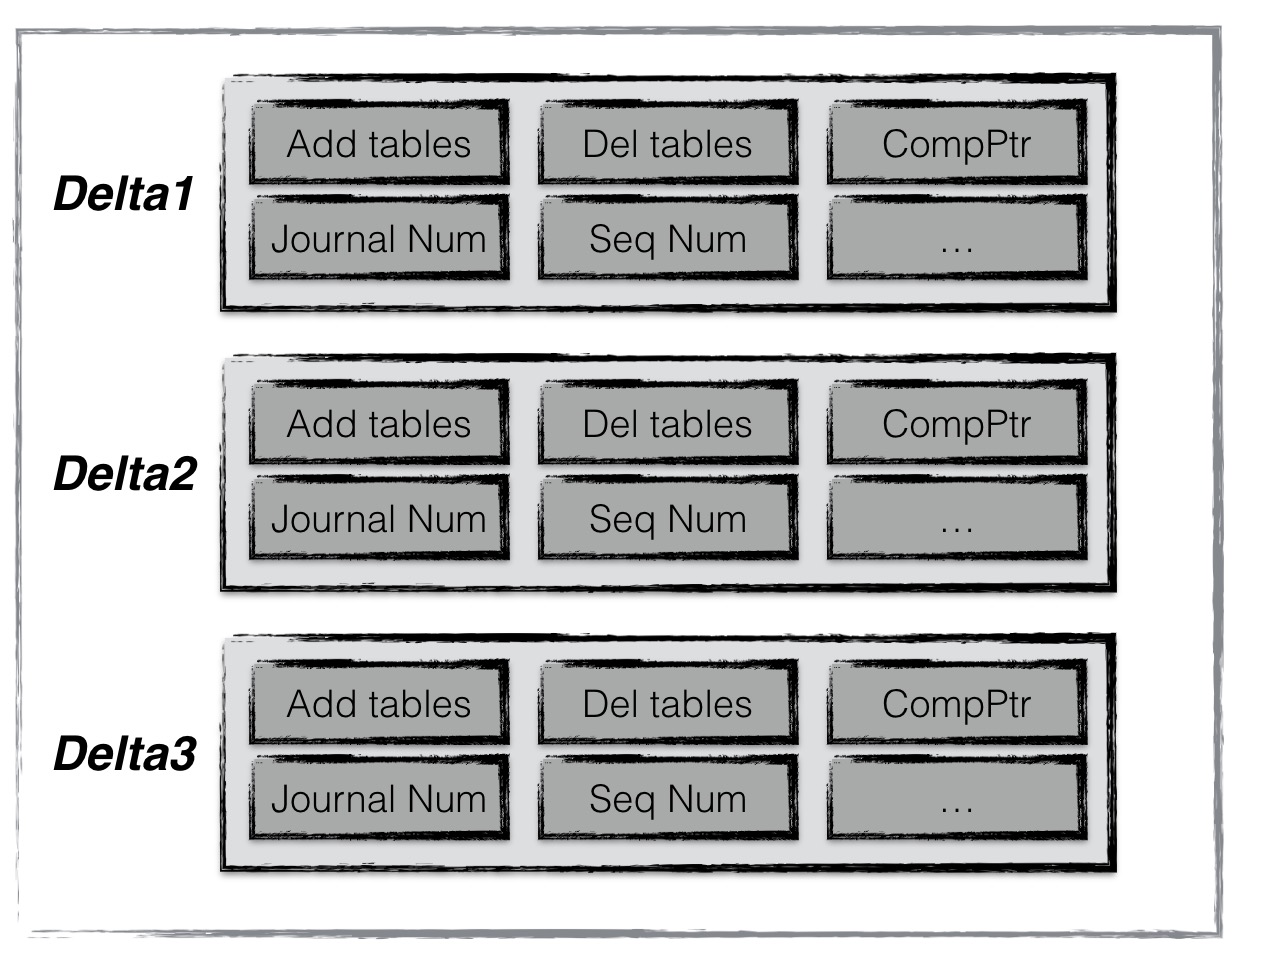
每次压缩完成,就得到一个Version。Version创建规则:versionNew = versionOld + VersionEdit,其中VersionEdit记录相对上一个Version变化的内容,比如新增/删除哪些sstable文件、日志编号、操作seq number等。manifest文件用于记录VersionEdit数据。
通过这些信息,LevelDB便可以在启动时,基于一个空的version,不断apply这些记录,最终得到一个上次运行结束时的版本信息。
manifest文件结构示意图:
5. 小结
读写过程代码流程梳理学习,通过画类图和流程图加深了理解。
6. 参考
1、leveldb
4、GPT


