LevelDB学习笔记(四) -- memtable结构实现
LevelDB学习笔记,本篇学习memtable结构实现,学习其基于的跳表实现细节。
1. 背景
前面跟踪学习了读写实现的基本流程,继续学习梳理其中具体的流程实现。本篇看memtable结构的实现,尤其是其中的跳表实现细节。
说明:本博客作为个人学习实践笔记,可供参考但非系统教程,可能存在错误或遗漏,欢迎指正。若需系统学习,建议参考原链接。
2. 跳表
跳表利用概率均衡技术,加快简化插入、删除操作,且保证绝大多数操作均拥有O(log n)的良好效率。
跳表由 William Pugh 在 1990 年提出,相关论文为:Skip Lists: A Probabilistic Alternative to Balanced Trees。
- 跳表底层是一个普通的
有序链表 - 按层建造,对于第i层(底层是1)每隔
2^i个节点,新增一个辅助指针(或者说每2^i新增一个辅助节点),最终一次节点的查询效率为O(log n) - 跳表的特征就是链表加
多级索引的结构。
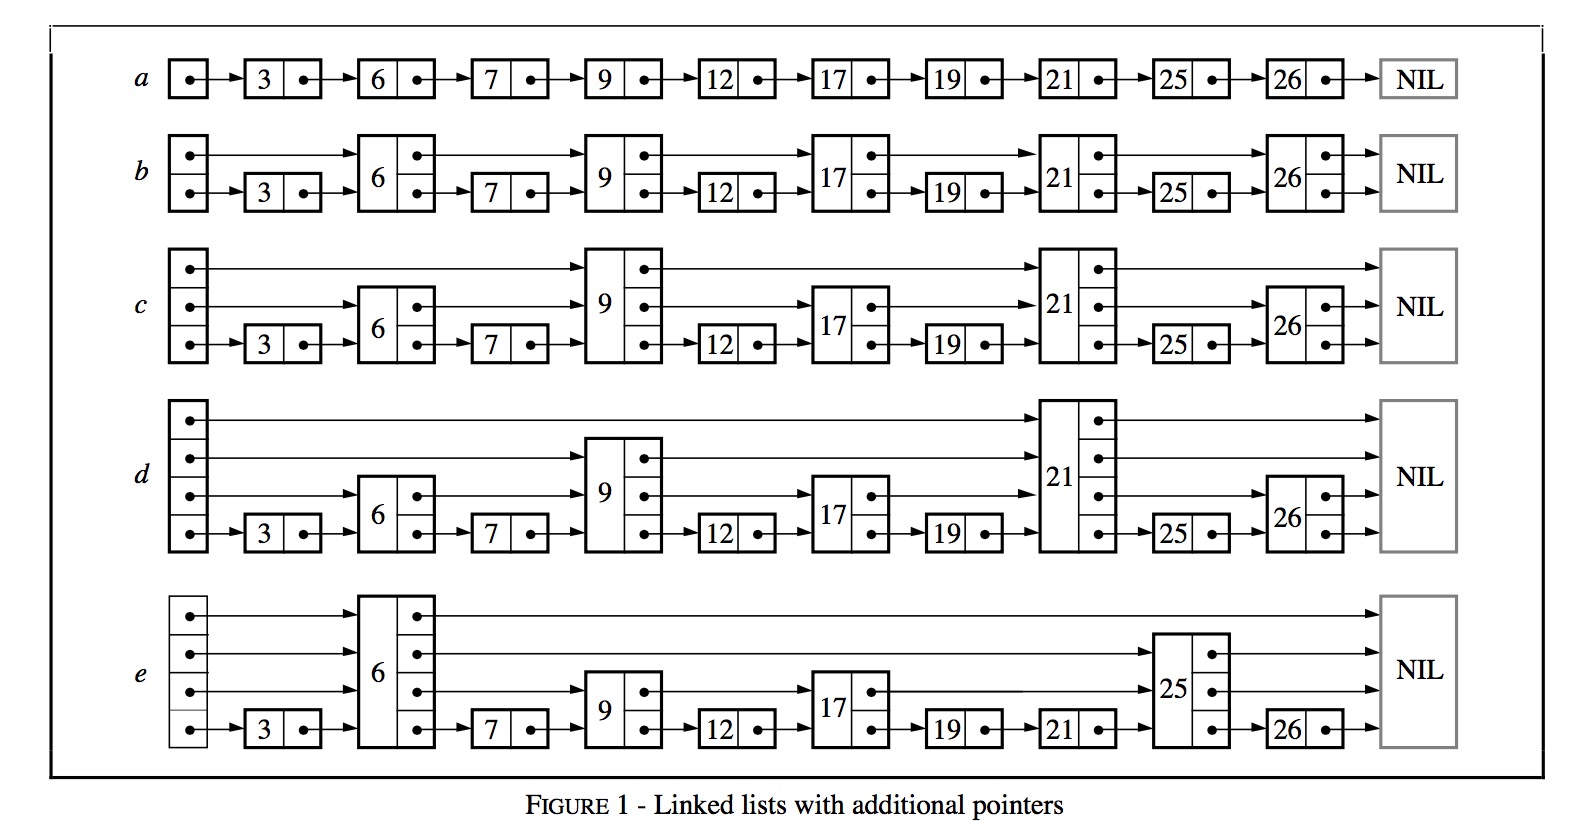
示意图如下:
a为初始的有序链表,查找复杂度为O(n)(最多需要查n次,n为节点数)b在a的基础上每隔2个节点(跳步采样)新增一个辅助指针,即建立索引,查找至多只需要n/2 + 1次c在b的基础上再跳步采样新增辅助指针,查找至多只需要n/4 + 2次- 同理,
d在c、e在d的基础上跳步采样新增辅助指针
基于上述的简单推导,各层新增辅助索引后,查找的时间复杂度级别为O(log n)
2.1. 时间复杂度分析
此处参考:跳表:为什么Redis一定要用跳表来实现有序集合?
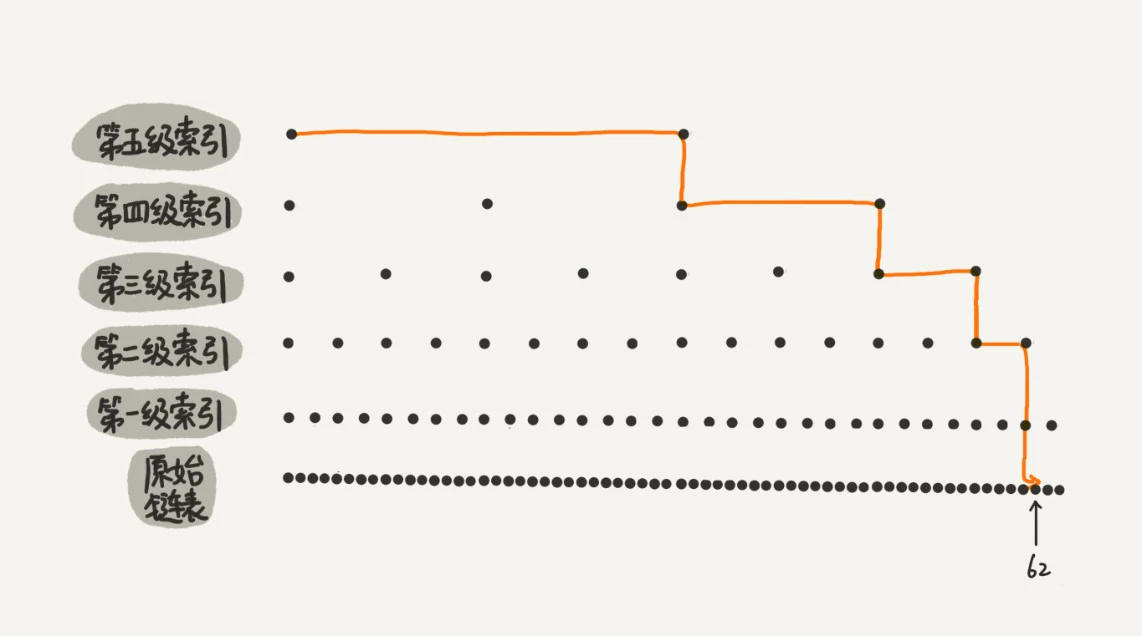
1、分析查找复杂度之前,先看这个辅助问题:如果链表里有 n 个节点,会有多少级索引呢?
每两个节点会抽出一个节点作为上一级索引的节点,那第一级索引的节点个数大约就是 n/2,第二级索引的节点个数大约就是 n/4,第三级索引的节点个数大约就是 n/8,依次类推,也就是说,第 k 级索引的节点个数是第 k-1 级索引的节点个数的 1/2,那第 k级索引节点的个数就是 n/(2^k)
假设索引有 h 级,最高级的索引有 2 个节点。通过上面的公式,我们可以得到 n/(2^h)=2,从而求得 h=log2(n)-1。如果包含原始链表这一层,整个跳表的高度就是 log2(n)。
所以解答上面的问题:如果链表里有n个节点,会有log2(n) - 1级索引。
2、各操作的时间复杂度
1)查找:O(logn)
2)插入:先查找(O(logn)),再执行插入(O(1)),总体复杂度O(logn)
跳表索引的动态更新:
- 当我们不停地往跳表中插入数据时,如果我们不更新索引,就有可能出现某 2 个索引节点之间数据非常多的情况。极端情况下,跳表还会退化成单链表。
- 作为一种动态数据结构,我们需要某种手段来维护索引与原始链表大小之间的
平衡,也就是说,如果链表中节点多了,索引节点就相应地增加一些,避免复杂度退化,以及查找、插入、删除操作性能下降。 - 跳表是通过
随机函数来维护前面提到的“平衡性”- 通过一个随机函数,来决定将这个节点插入到哪几级索引中,比如随机函数生成了值 K,那我们就将这个节点添加到第一级到第 K 级这 K 级索引中。
- 随机函数的选择很有讲究,从概率上来讲,能够保证跳表的索引大小和数据大小平衡性,不至于性能过度退化。(即上面提到的
概率均衡)
3)删除:先查找(O(logn)),再删除(O(1)),总体复杂度O(logn)
注意:如果这个节点在索引中也有出现,我们除了要删除原始链表中的节点,还要删除索引中的。
2.2. 空间复杂度分析
假设原始链表大小为 n,那第一级索引大约有 n/2 个节点,第二级索引大约有 n/4 个节点,以此类推,每上升一级就减少一半,直到剩下 2 个节点。如果我们把每层索引的节点数写出来,就是一个等比数列。
这几级索引的节点总和就是 n/2 + n/4 + n/8 … + 8 + 4 + 2 = n-2。所以,跳表的空间复杂度是 O(n)。
也就是说,如果将包含 n 个节点的单链表构造成跳表,我们需要额外再用接近 n 个节点的存储空间。
上述等比数列求和过程如下:
- 等比数列求和 n/2, n/4, … , 2 这个数列中一共有
log2(n/2)项,等比数列求和公式S = a0(1-q^n) / (1-q), 其中a0表示首项,n表示项数。 - 这里的
a0=n/2,项数n=log2(n/2),q=1/2,则S = (n/2)*(1-2/n) / (1-1/2) = n-2(其中q^n对应(1/2)^( log2(n/2) ) = 2/n)
通过每3个或者每5个节点采样,可进一步减少空间占用。比如间隔3个节点采样,总的索引节点大约就是 n/3+n/9+n/27+...+9+3+1=n/2
实际上,在软件开发中,我们不必太在意索引占用的额外空间(PS:大规模场景的性能优化需要分析评估)。在讲数据结构和算法时,我们习惯性地把要处理的数据看成整数,但是在实际的软件开发中,原始链表中存储的有可能是很大的对象,而索引节点只需要存储关键值和几个指针,并不需要存储对象,所以当对象比索引节点大很多时,那索引占用的额外空间就可以忽略了。
3. MemTable类定义
LevelDB中的MemTable是有序的,底层基于跳表(skiplist)实现。绝大多数操作(读/写)的时间复杂度均为O(log n),有着与平衡树相媲美的操作效率,但是从实现的角度来说简单许多。
看下内存数据库memtable的定义,可看到MemTable中的具体类为:SkipList<const char*, KeyComparator>
1
2
3
4
5
6
7
8
9
10
11
12
13
14
// db/memtable.h
class MemTable {
    ...
    // 跳表
    typedef SkipList<const char*, KeyComparator> Table;

    ~MemTable();  // Private since only Unref() should be used to delete it

    KeyComparator comparator_;
    int refs_;
    Arena arena_;
    // Table是跳表结构
    Table table_;
};
4. SkipList实现
看下LevelDB里面的跳表定义和大致实现。
4.1. SkipList定义
1
2
3
4
5
6
7
8
9
10
11
12
13
14
15
16
17
18
19
20
21
22
23
24
25
26
27
28
29
30
31
32
33
34
35
36
37
38
39
40
41
42
43
44
45
46
47
48
49
50
51
52
53
54
55
56
// db/skiplist.h
template <typename Key, class Comparator>
class SkipList {
 private:
  struct Node;

 public:
  explicit SkipList(Comparator cmp, Arena* arena);

  SkipList(const SkipList&) = delete;
  SkipList& operator=(const SkipList&) = delete;

  void Insert(const Key& key);

  bool Contains(const Key& key) const;

  // 定义迭代器内部类
  class Iterator {
   public:
    ...
    const Key& key() const;
    void Next();
    void Prev();
    void Seek(const Key& target);
    ...
  };

 private:
  enum { kMaxHeight = 12 };

  inline int GetMaxHeight() const {
    return max_height_.load(std::memory_order_relaxed);
  }

  Node* NewNode(const Key& key, int height);
  int RandomHeight();
  bool Equal(const Key& a, const Key& b) const { return (compare_(a, b) == 0); }

  bool KeyIsAfterNode(const Key& key, Node* n) const;

  Node* FindGreaterOrEqual(const Key& key, Node** prev) const;

  Node* FindLessThan(const Key& key) const;

  Node* FindLast() const;

  // Immutable after construction
  Comparator const compare_;
  Arena* const arena_;  // Arena used for allocations of nodes

  Node* const head_;

  std::atomic<int> max_height_;  // Height of the entire list

  Random rnd_;
};
4.2. Node定义
这里的std::atomic<Node*> next_[1];,虽然只有一个数组成员,但其利用后面的连续空间存储其他层的节点,所以实际表示了一个节点指针数组。
next_[0]则表示最底层链表中的节点,其他层用next_[1]、…、next_[level-1]等表示。
1
2
3
4
5
6
7
8
9
10
11
12
13
14
15
16
17
18
19
20
21
22
23
24
25
26
27
28
29
30
31
32
33
34
35
36
37
38
39
40
41
// db/skiplist.h
template <typename Key, class Comparator>
struct SkipList<Key, Comparator>::Node {
  explicit Node(const Key& k) : key(k) {}

  Key const key;

  // Accessors/mutators for links.  Wrapped in methods so we can
  // add the appropriate barriers as necessary.
  // 传入的n是层数,对于高层有的索引节点,下面几层肯定也有该节点
  Node* Next(int n) {
    assert(n >= 0);
    // Use an 'acquire load' so that we observe a fully initialized
    // version of the returned Node.
    // 示意图如下:next_在这n层(0~n-1)都表示同一个节点(不准确,每层的next是不一样的)
    // *           *            *
    // *     *     *      *     *
    // *  *  *  *  *   *  *  *  *
    return next_[n].load(std::memory_order_acquire);
  }
  void SetNext(int n, Node* x) {
    assert(n >= 0);
    // Use a 'release store' so that anybody who reads through this
    // pointer observes a fully initialized version of the inserted node.
    next_[n].store(x, std::memory_order_release);
  }

  // No-barrier variants that can be safely used in a few locations.
  Node* NoBarrier_Next(int n) {
    assert(n >= 0);
    return next_[n].load(std::memory_order_relaxed);
  }
  void NoBarrier_SetNext(int n, Node* x) {
    assert(n >= 0);
    next_[n].store(x, std::memory_order_relaxed);
  }

 private:
  // Array of length equal to the node height.  next_[0] is lowest level link.
  std::atomic<Node*> next_[1];
};
4.2.1. 内存序说明
指令重排:
编译器或处理器为了优化性能,可能会对执行指令重新排序。这在单线程程序中通常是安全的,但在多线程环境中可能会导致问题,因为不同线程之间的指令重排可能导致不一致的状态。
例如,在一个简单的多线程场景中,线程A可能先写入一个变量,然后设置一个标志表示它完成了;线程B等待这个标志被设置,然后读取该变量。如果没有适当的内存序约束,编译器或处理器可能会重排这些指令,导致线程B在变量被正确设置之前就读取它,从而导致错误的结果。
上述Node类中的原子类操作,Next、SetNext保证了比较安全的内存顺序(memory order);NoBarrier_Next、NoBarrier_SetNext则比较宽松。
std::memory_order_relaxed:不对重排做限制,只保证相关共享内存访问的原子性。std::memory_order_acquire: 用在 load 时,保证同线程中该 load 之后的对相关内存读写语句不会被重排到 load 之前,并且其他线程中对同样内存用了 store release(next_[n].store(x, std::memory_order_release)) 都对其可见。std::memory_order_release:用在 store 时,保证同线程中该 store 之后的对相关内存的读写语句不会被重排到 store 之前,并且该线程的所有修改对用了 load acquire(next_[n].load(std::memory_order_acquire)) 的其他线程都可见。
load acquire和store release常配套使用,之前在学习:创建型设计模式-单例模式时,其中的双重检测单例里,也有个相关示例。
4.3. 插入:SkipList::Insert
上面的Node类定义的巧妙之处,通过跳表的插入操作逻辑来看一下。
标题中的SkipList::Insert简化了一下相关模板的参数,完整声明和定义如下:
1
2
3
4
5
6
7
8
9
10
11
12
13
14
15
16
17
18
19
20
21
22
23
24
25
26
27
28
29
30
31
32
33
34
35
36
37
38
39
40
41
// db/skiplist.h
template <typename Key, class Comparator>
void SkipList<Key, Comparator>::Insert(const Key& key) {
  // TODO(opt): We can use a barrier-free variant of FindGreaterOrEqual()
  // here since Insert() is externally synchronized.
  // 层数直接取最大值(kMaxHeight = 12)
  Node* prev[kMaxHeight];
  // 找到 >= key 的第一个节点
  // * * * key[*  *
  Node* x = FindGreaterOrEqual(key, prev);

  // Our data structure does not allow duplicate insertion
  // 不允许插入重复数据(外部保证)
  assert(x == nullptr || !Equal(key, x->key));

  // 随机获取一个 level 值。每次以 1/4 的概率增加层数,最后返回的层数 <= 12
  int height = RandomHeight();
  if (height > GetMaxHeight()) {
    // 若生成层数 > 当前实际层数,高层索引指针置为跳表头,从高层查找时会继续往下层找
    // *
    // *   *   key[*    * = GetMaxHeight(); i < height; i++) {
    for (int i = GetMaxHeight(); i < height; i++) {
      prev[i] = head_;
    }

    max_height_.store(height, std::memory_order_relaxed);
  }

  // 构造要插入的节点
  x = NewNode(key, height);
  // 链表的插入操作,只是各层前驱节点也需设置
  for (int i = 0; i < height; i++) {
    // NoBarrier_SetNext() suffices since we will add a barrier when
    // we publish a pointer to "x" in prev[i].
    // 要插入的节点,其前驱节点列表设置为和上述查找到的节点一样,即通过同样的前驱索引路径可找到该节点
    // 为了保证并发读的正确性,先设置要插入的节点指针,再设置原跳表中节点(prev)指针
    x->NoBarrier_SetNext(i, prev[i]->NoBarrier_Next(i));
    // 每层前驱都进行插入节点操作
    prev[i]->SetNext(i, x);
  }
}
4.3.1. FindGreaterOrEqual
1
2
3
4
5
6
7
8
9
10
11
12
13
14
15
16
17
18
19
20
21
22
23
24
25
26
27
28
29
30
31
32
// db/skiplist.h
template <typename Key, class Comparator>
typename SkipList<Key, Comparator>::Node*
SkipList<Key, Comparator>::FindGreaterOrEqual(const Key& key,
                                              Node** prev) const {
  Node* x = head_;
  // 当前高度
  int level = GetMaxHeight() - 1;
  while (true) {
    // 依次从最高层索引往下查找,直到 key <= 某节点
    // Node* 的Next可以获取本层的下一个节点,也可以获取下一层的下一个节点
    Node* next = x->Next(level);
    // 只要key在节点后面(>)就继续next
    if (KeyIsAfterNode(key, next)) {
      // Keep searching in this list
      x = next;
    } else {
      // *    [*    *
      // * [*  *  * *
      // prev里依次记录索引指针
      if (prev != nullptr) prev[level] = x;
      if (level == 0) {
        // 查找到最底层链表了
        return next;
      } else {
        // Switch to next list
        // 继续下一层查找
        level--;
      }
    }
  }
}
1
2
3
4
5
6
7
// db/skiplist.h
template <typename Key, class Comparator>
bool SkipList<Key, Comparator>::KeyIsAfterNode(const Key& key, Node* n) const {
  // null n is considered infinite
  // key > 某节点(即key在节点后面)则返回true
  return (n != nullptr) && (compare_(n->key, key) < 0);
}
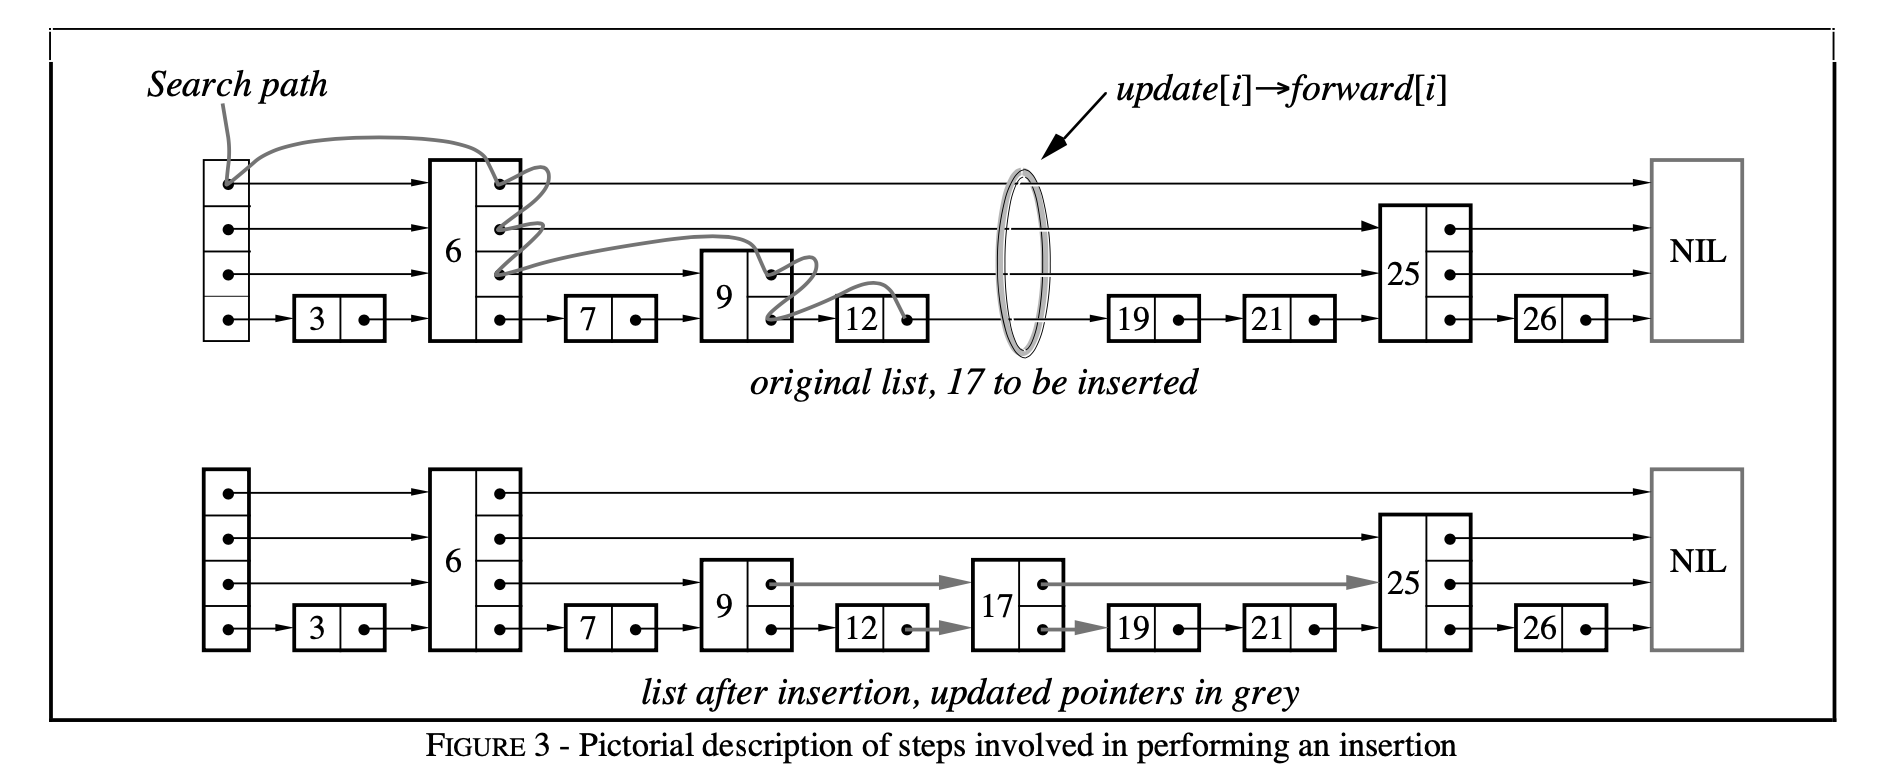
4.3.2. 查找及插入示意图
查找插入示意图(关注高层到低层的索引指针的变化路径):
4.3.3. SkipList::NewNode
这里讲一下上面SkipList::Insert插入中的创建NewNode新节点逻辑。
LevelDB中自行管理内存分配,并利用Placement New语法在指定内存上构造实例。
1
2
3
4
5
6
7
8
9
10
11
12
13
14
15
16
17
// db/skiplist.h
template <typename Key, class Comparator>
typename SkipList<Key, Comparator>::Node* SkipList<Key, Comparator>::NewNode(
    const Key& key, int height) {
  // 申请节点空间,预留了空间给对应的各层指针(最多不会超过height-1层索引)
  // 这里申请的空间是内存对齐的,便于atomic原子操作
  char* const node_memory = arena_->AllocateAligned(
      sizeof(Node) + sizeof(std::atomic<Node*>) * (height - 1));
  /*
    Placement New语法,用法:`new (pointer_to_location) Type(args...);`
    不会另外申请内存
    不会自动调用析构函数
    禁止拷贝和move(对于此处的跳表,并不提供删除节点,只要跳表不被销毁空间就一直在)
  */
  // 用于在指定的内存处(node_memory),构造一个Node实例
  return new (node_memory) Node(key);
}
1
2
3
4
5
6
7
8
9
10
11
12
13
14
15
16
17
18
19
20
21
22
23
24
// util/arena.cc
char* Arena::AllocateAligned(size_t bytes) {
  // 按指针长度对齐(64位一般8字节)
  const int align = (sizeof(void*) > 8) ? sizeof(void*) : 8;
  // 申请的内存空间,必须按 2^n 大小对齐
  static_assert((align & (align - 1)) == 0,
                "Pointer size should be a power of 2");
  size_t current_mod = reinterpret_cast<uintptr_t>(alloc_ptr_) & (align - 1);
  size_t slop = (current_mod == 0 ? 0 : align - current_mod);
  size_t needed = bytes + slop;
  char* result;
  // 剩余空间够用则不用新增
  if (needed <= alloc_bytes_remaining_) {
    result = alloc_ptr_ + slop;
    alloc_ptr_ += needed;
    alloc_bytes_remaining_ -= needed;
  } else {
    // 需要的空间比剩余空间大,则按实际大小申请空间
    // AllocateFallback always returned aligned memory
    result = AllocateFallback(bytes);
  }
  assert((reinterpret_cast<uintptr_t>(result) & (align - 1)) == 0);
  return result;
}
4.4. 查找:SkipList::Contains
上面插入操作中是先根据key查找合适的节点位置,再进行插入。此处的查找也是基于上面的FindGreaterOrEqual函数。
1
2
3
4
5
6
7
8
9
10
11
// db/skiplist.h
template <typename Key, class Comparator>
bool SkipList<Key, Comparator>::Contains(const Key& key) const {
  Node* x = FindGreaterOrEqual(key, nullptr);
  // 只有key完全相同,才算查找到
  if (x != nullptr && Equal(key, x->key)) {
    return true;
  } else {
    return false;
  }
}
4.5. 遍历:迭代器
利用内部类Iterator(leveldb::SkipList::Iterator)实现LevelDB节点的遍历操作。
另外提供给用户的创建迭代器接口:include/leveldb/db.h中的Iterator* NewIterator(const ReadOptions& options),也主要由此处的内部类实现。
类图关系如下:
include/leveldb/iterator.h中定义抽象类IteratorMemTable类提供Iterator* NewIterator();,其返回的具体类为:MemTableIteratorMemTableIterator实现了上述iterator.h中的Iterator抽象类MemTableIterator中的逻辑就是基于内部类SkipList::Iterator- 另外有其他迭代器也实现了上述iterator.h中的
Iterator抽象类,此处暂不关注- 如
DBIter类也实现上述Iterator抽象类(代码位于db/db_iter.cc) - 还有
EmptyIterator、MergingIterator、TwoLevelIterator、Version::LevelFileNumIterator等
- 如
MemTableIterator类定义如下:
1
2
3
4
5
6
7
8
9
10
11
12
13
14
15
16
17
18
// db/memtable.cc
class MemTableIterator : public Iterator {
 public:
  // 初始化列表中,MemTable::Table::Iterator 初始化为 MemTable::Table* table ?
  // SkipList的内部类`SkipList::Iterator`对应的构造函数就是传一个SkipList*: explicit Iterator(const SkipList* list);
    // MemTable::Table 实际是SkipList模板类的具体类: typedef SkipList<const char*, KeyComparator> Table;
  explicit MemTableIterator(MemTable::Table* table) : iter_(table) {}
  ...
  void Seek(const Slice& k) override { iter_.Seek(EncodeKey(&tmp_, k)); }
  void SeekToFirst() override { iter_.SeekToFirst(); }
  void SeekToLast() override { iter_.SeekToLast(); }
  void Next() override { iter_.Next(); }
  void Prev() override { iter_.Prev(); }
  ...
 private:
  MemTable::Table::Iterator iter_;
  std::string tmp_;  // For passing to EncodeKey
};
内部类SkipList::Iterator定义:
构造时就传入一个指定跳表。
1
2
3
4
5
6
7
8
9
10
11
12
13
14
15
16
17
18
19
20
21
22
// db/skiplist.h
class SkipList{
  ...
  class Iterator {
   public:
    // Initialize an iterator over the specified list.
    explicit Iterator(const SkipList* list);
    bool Valid() const;
    const Key& key() const;
    void Next();
    void Prev();
    void Seek(const Key& target);
    void SeekToFirst();
    void SeekToLast();

   private:
    const SkipList* list_;
    Node* node_;
    // Intentionally copyable
  };
  ...
};
内部类对应的部分接口实现如下:
1
2
3
4
5
6
7
8
9
10
11
12
13
14
15
16
17
18
19
20
21
22
23
24
25
26
27
28
29
30
31
32
33
34
35
36
37
38
39
40
41
42
43
44
// db/skiplist.h
template <typename Key, class Comparator>
inline SkipList<Key, Comparator>::Iterator::Iterator(const SkipList* list) {
  list_ = list;
  node_ = nullptr;
}

template <typename Key, class Comparator>
inline void SkipList<Key, Comparator>::Iterator::Next() {
  assert(Valid());
  node_ = node_->Next(0);
}

template <typename Key, class Comparator>
inline void SkipList<Key, Comparator>::Iterator::Prev() {
  // Instead of using explicit "prev" links, we just search for the
  // last node that falls before key.
  assert(Valid());
  // 找 <key 的节点
  node_ = list_->FindLessThan(node_->key);
  if (node_ == list_->head_) {
    node_ = nullptr;
  }
}

template <typename Key, class Comparator>
inline void SkipList<Key, Comparator>::Iterator::Seek(const Key& target) {
  // 同插入、查找中用的查找逻辑
  node_ = list_->FindGreaterOrEqual(target, nullptr);
}

template <typename Key, class Comparator>
inline void SkipList<Key, Comparator>::Iterator::SeekToFirst() {
  node_ = list_->head_->Next(0);
}

// 和Prev类似,也是从头开始查找到最后的节点
template <typename Key, class Comparator>
inline void SkipList<Key, Comparator>::Iterator::SeekToLast() {
  node_ = list_->FindLast();
  if (node_ == list_->head_) {
    node_ = nullptr;
  }
}
注意,此处Iterator::Prev()的实现,相比在节点中额外增加一个 prev 指针,LevelDB使用从头开始的查找定位其 prev 节点。
该迭代器没有为每个节点增加一个额外的 prev 指针以进行反向迭代,而是用了选择从 head 开始查找。这也是一种用时间换空间的取舍。当然,其假设是前向遍历情况相对较少。
Prev()中的FindLessThan实现:
1
2
3
4
5
6
7
8
9
10
11
12
13
14
15
16
17
18
19
20
21
22
23
24
25
// db/skiplist.h
template <typename Key, class Comparator>
typename SkipList<Key, Comparator>::Node*
SkipList<Key, Comparator>::FindLessThan(const Key& key) const {
  Node* x = head_;
  int level = GetMaxHeight() - 1;
  while (true) {
    assert(x == head_ || compare_(x->key, key) < 0);
    // 从最高层往下找,直到底层链表
    Node* next = x->Next(level);
    // 下一个节点为空 或者 在key后面则找下一层
    // *  *  key]  *
    // *  *]   *   *
    if (next == nullptr || compare_(next->key, key) >= 0) {
      if (level == 0) {
        return x;
      } else {
        // Switch to next list
        level--;
      }
    } else {
      x = next;
    }
  }
}
5. 小结
学习了MemTable和跳表的实现细节,跟踪梳理了跳表的插入、查询,以及迭代器代码逻辑。
6. 参考
1、leveldb
3、漫谈 LevelDB 数据结构(一):跳表(Skip List)
5、GPT


