Ceph学习笔记(三) -- 对象存储
梳理Ceph对象存储和相关流程。
1. 引言
前面梳理了Ceph的基本架构,并简单搭建了Ceph集群。现在进入到代码层,对Ceph功能进行进一步深入,本篇梳理 对象存储,并跟踪梳理代码处理流程。
2. 对象存储说明
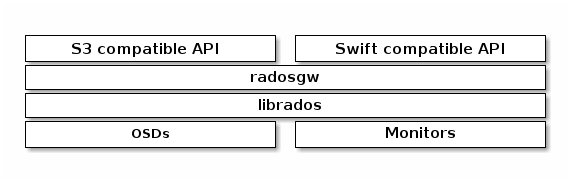
2.1. Ceph对象存储架构
Ceph对象存储包含一个Ceph存储集群和一个对象网关(Ceph Object Gateway)。
- Ceph存储集群:如前面 Ceph集群构成 中所述,一个Ceph存储集群中至少包含
monitor、manager、osd,文件存储则还包含mds。 - 对象网关:构建在
librados之上,通过radosgw守护进程提供服务,为应用程序提供对象存储RESTful API,用于操作Ceph存储集群。
Ceph支持两种对象存储接口,两者共享一个命名空间(namespace),意味着一类接口写的数据可以通过另一类接口读取。
S3兼容接口,Amazon S3 RESTful APISwift兼容接口,OpenStack Swift API
2.2. S3对象存储
介绍下Amazon的S3(Simple Storage Service )对象存储,用户可以通过任意支持HTTP协议的工具,基于REST API来访问可读对象(object)。REST API中使用标准的HTTP头和状态码,因此一些标准浏览器和工具箱(toolkit)都可以正常访问S3。
若在代码里直接使用REST API,需要编写计算签名的代码来对请求进行鉴权。建议使用下述两种方式:
- 1、使用 AWS SDKs 来发送请求,SDK客户端会根据用户提供的
access keys来进行校验。如果没有其他更好的理由,一般都使用AWS SDKs方式。 - 2、使用
AWS CLI来触发S3 API。
2.2.1. S3 API
详情可见:S3 API Reference。
S3 API包含操作(actions/operations)和数据类型(data types)两部分,并组织成了 3个集合:
Amazon S3,定义了bucket和object层级的API操作Amazon S3 Control,定义了管理其他S3资源的API操作Amazon S3 on Outposts,可以扩展AWS到用户本地环境
这里看下针对bucket和object的 Amazon S3 部分操作:
- 创建bucket:
CreateBucket- 创建bucket需要一个AK(Access Key),不允许匿名创建请求。
- 详情和示例可见:CreateBucket
示例:创建名为amzn-s3-demo-bucket的bucket
1
2
3
4
5
6
7
8
9
10
11
12
13
14
15
16
17
    <!-- 请求 -->
    PUT / HTTP/1.1
    Host: amzn-s3-demo-bucket.s3.<Region>.amazonaws.com
    Content-Length: 0
    Date: Wed, 01 Mar  2006 12:00:00 GMT
    Authorization: authorization string

    <!-- 应答 -->
    HTTP/1.1 200 OK
    x-amz-id-2: YgIPIfBiKa2bj0KMg95r/0zo3emzU4dzsD4rcKCHQUAdQkf3ShJTOOpXUueF6QKo
    x-amz-request-id: 236A8905248E5A01
    Date: Wed, 01 Mar  2006 12:00:00 GMT

    Location: /amzn-s3-demo-bucket
    Content-Length: 0
    Connection: close
    Server: AmazonS3
- 创建object:
PutObject- 向bucket中添加一个object
- S3是一个分布式系统,可以通过
S3 Object Lock进行并发请求的保护 - URI请求参数很多,具体可见:PutObject
示例:将图片my-image.jpg存入到名为myBucket的bucket中,下面的[11434 bytes of object data]表示具体二进制数据
1
2
3
4
5
6
7
8
9
10
11
12
13
14
15
16
17
18
19
20
21
22
    <!-- 请求 -->
    PUT /my-image.jpg HTTP/1.1
    Host: myBucket.s3.<Region>.amazonaws.com
    Date: Wed, 12 Oct 2009 17:50:00 GMT
    Authorization: authorization string
    Content-Type: text/plain
    Content-Length: 11434
    x-amz-meta-author: Janet
    Expect: 100-continue
    [11434 bytes of object data]

    <!-- 应答 -->
    HTTP/1.1 100 Continue

    HTTP/1.1 200 OK
    x-amz-id-2: LriYPLdmOdAiIfgSm/F1YsViT1LW94/xUQxMsF7xiEb1a0wiIOIxl+zbwZ163pt7
    x-amz-request-id: 0A49CE4060975EAC
    Date: Wed, 12 Oct 2009 17:50:00 GMT
    ETag: "1b2cf535f27731c974343645a3985328"
    Content-Length: 0
    Connection: close
    Server: AmazonS3
- 下载object:
GetObject- 指定object的完整key名
- GetObject
示例:下载 my-image.jpg 对象,应答中的[434234 bytes of object data]表示图片对象的二进制数据
1
2
3
4
5
6
7
8
9
10
11
12
13
14
15
16
    <!-- 请求 -->
    GET /my-image.jpg HTTP/1.1
    Host: amzn-s3-demo-bucket.s3.<Region>.amazonaws.com
    Date: Mon, 3 Oct 2016 22:32:00 GMT
    Authorization: authorization string

    <!-- 应答 -->
    HTTP/1.1 200 OK
    x-amz-id-2: eftixk72aD6Ap51TnqcoF8eFidJG9Z/2mkiDFu8yU9AS1ed4OpIszj7UDNEHGran
    x-amz-request-id: 318BC8BC148832E5
    Date: Mon, 3 Oct 2016 22:32:00 GMT
    Last-Modified: Wed, 12 Oct 2009 17:50:00 GMT
    ETag: "fba9dede5f27731c9771645a39863328"
    Content-Length: 434234

    [434234 bytes of object data]
- 获取bucket列表:
ListBuckets
只要URI即可,不需要HTTP body,URI里可以设置条件,比如此处限制bucket数量为1000:
1
2
3
4
5
6
7
8
    <!-- 请求 -->
    GET /?max-buckets=1000&host:s3.us-east-2.amazonaws.com HTTP/1.1

    <!-- 应答 -->
    HTTP/1.1 200 OK
    <ListAllMyBucketsResult>
    ...
    </ListAllMyBucketsResult>
2.2.2. S3 SDK
通过上面的S3 SDK链接可看到支持多种编程语言的SDK,比如C++、Go、Java、JS、Rust等等,这里简单看下 C++ SDK。
C++的S3 SDK基于CMake构建,C++标准需>= C++11。使用C++ SDK的示例,可见:example_code。
1
2
3
4
5
6
7
8
9
10
11
12
13
14
15
16
17
18
19
20
21
22
23
24
25
26
27
28
29
30
31
32
33
34
35
36
37
38
39
40
41
42
43
44
bool AwsDoc::S3::putObject(const Aws::String &bucketName,
                           const Aws::String &fileName,
                           const Aws::S3::S3ClientConfiguration &clientConfig) {
    Aws::S3::S3Client s3Client(clientConfig);

    Aws::S3::Model::PutObjectRequest request;
    request.SetBucket(bucketName);
    // 此处以文件名为key,具体以实际为准
    request.SetKey(fileName);
    std::shared_ptr<Aws::IOStream> inputData =
            Aws::MakeShared<Aws::FStream>("SampleAllocationTag",
                                          fileName.c_str(),
                                          std::ios_base::in | std::ios_base::binary);
    request.SetBody(inputData);

    // 请求
    Aws::S3::Model::PutObjectOutcome outcome =
            s3Client.PutObject(request);
    if (!outcome.IsSuccess()) {
        std::cerr << "Error: putObject: " << outcome.GetError().GetMessage() << std::endl;
    } else {
        std::cout << "Added object '" << fileName << "' to bucket '" << bucketName << "'.";
    }
    return outcome.IsSuccess();
}

int main(int argc, char* argv[])
{
    ...
    Aws::SDKOptions options;
    Aws::InitAPI(options);
    {
        const Aws::String fileName = argv[1];
        const Aws::String bucketName = argv[2];

        Aws::S3::S3ClientConfiguration clientConfig;
        // Optional: Set to the AWS Region in which the bucket was created (overrides config file).
        // clientConfig.region = "us-east-1";

        AwsDoc::S3::putObject(bucketName, fileName, clientConfig);
    }
    Aws::ShutdownAPI(options);
    return 0;
}
2.3. Swift对象存储
OpenStack对象存储(也称Swift)是一个高可用、分布式、最终一致性的对象存储,通过REST(Representational State Transfer) API进行创建、修改、获取对象和元数据。
- 创建容器:
PUT /v1/{account}/{container}- 示例:创建名为
steven的container时不带元数据,curl -i $publicURL/steven -X PUT -H "Content-Length: 0" -H "X-Auth-Token: $token"
- 示例:创建名为
- 创建对象:
PUT /v1/{account}/{container}/{object}- 示例:向名为
janeausten的container中创建helloworld.txt对象,url -i $publicURL/janeausten/helloworld.txt -X PUT -d "Hello" -H "Content-Type: text/html; charset=UTF-8" -H "X-Auth-Token: $token"
- 示例:向名为
3. Ceph对象存储代码流程
为了便于代码查看和跳转,为clangd生成compile_commands.json(电脑快用9年了,cpptools跑起来风扇就呼呼响)。自己在MacOS上很多依赖安装有不少问题,折腾了挺久,在linux上生成后再替换路径可以勉强使用。
3.1. main函数入口
rgw的入口在rgw_main.cc中。
1
2
3
4
5
6
7
8
9
10
11
12
13
14
15
16
17
18
19
20
21
22
23
24
25
26
27
28
29
30
31
32
33
34
35
36
37
38
39
40
41
42
43
44
45
46
47
48
49
50
// ceph-v19.2.2/src/rgw/rgw_main.cc
// 相对于17.2.x,main代码的组织简洁了很多,之前版本main函数有好几百行
int main(int argc, char *argv[])
{
  ...
  // 入参转换为vector
  auto args = argv_to_vec(argc, argv);
  ...
  // 全局初始化,其中会分配ceph上下文类`CephContext`并初始化、并设置实例指针到 g_ceph_context 全局变量
  auto cct = rgw_global_init(&defaults, args, CEPH_ENTITY_TYPE_CLIENT,
                             CODE_ENVIRONMENT_DAEMON, flags);

  DoutPrefix dp(cct.get(), dout_subsys, "rgw main: ");
  // rgw的主服务类
  rgw::AppMain main(&dp);

  // RGW 的前端(Frontend)负责处理客户端的请求:监听网络端口、处理HTTP/HTTPS请求、路由请求到后端的 RADOS 存储集群
  main.init_frontends1(false /* nfs */);
  // 根据配置绑定numa亲和性
  main.init_numa();
  ...
  // 定时器初始化
  init_timer.init();
  ...
  common_init_finish(g_ceph_context);
  // 初始化异步信号的处理器(其中是一个线程,利用poll轮询检测32个信号注册的读事件)
  init_async_signal_handler();
  // 注册部分信号和对应处理函数
  register_async_signal_handler(SIGHUP, rgw::signal::sighup_handler);
  register_async_signal_handler(SIGTERM, rgw::signal::handle_sigterm);
  register_async_signal_handler(SIGINT, rgw::signal::handle_sigterm);
  ...
  main.init_perfcounters();
  // 初始化DNS、curl、http客户端和kmip秘钥管理
  main.init_http_clients();

  r = main.init_storage();
  ...
  // 初始化s3、swift对应的rest api
  main.cond_init_apis();
  main.init_ldap();
  main.init_opslog();
  main.init_tracepoints();
  main.init_lua();
  // 里面包含了RGW前端具体初始化操作
  r = main.init_frontends2(nullptr /* RGWLib */);
  ...
  rgw::signal::wait_shutdown();
  ...
}
AppMain主服务类(该类的成员函数实现在rgw_appmain.cc中):
1
2
3
4
5
6
7
8
9
10
11
12
13
14
15
16
17
18
19
20
21
22
23
24
25
26
27
28
// ceph-v19.2.2/src/rgw/rgw_main.h
class AppMain {
  bool have_http_frontend{false};
  // 前端是否包含nfs类型
  bool nfs{false};

  // 支持多个前端
  std::vector<RGWFrontend*> fes;
  std::vector<RGWFrontendConfig*> fe_configs;
  ...
  // rest请求处理类
  RGWREST rest;
  std::unique_ptr<rgw::lua::Background> lua_background;
  std::unique_ptr<rgw::auth::ImplicitTenants> implicit_tenant_context;
  // 调度
  std::unique_ptr<rgw::dmclock::SchedulerCtx> sched_ctx;
  // 限流
  std::unique_ptr<ActiveRateLimiter> ratelimiter;
  std::map<std::string, std::string> service_map_meta;
  ...
  // 日志处理
  const DoutPrefixProvider* dpp;
  RGWProcessEnv env;
  ...
public:
  AppMain(const DoutPrefixProvider* dpp);
  ...
};
3.2. 客户端HTTP请求管理类
由RGWHTTPManager类负责客户端HTTP请求的处理,其初始化流程为:main -> main.init_http_clients(); -> rgw_http_client_init,其中会创建RGWHTTPManager实例。
init_http_clients:
1
2
3
4
5
6
7
8
// ceph-v19.2.2/src/rgw/rgw_appmain.cc
void rgw::AppMain::init_http_clients()
{
  rgw_init_resolver();
  rgw::curl::setup_curl(fe_map);
  rgw_http_client_init(dpp->get_cct());
  rgw_kmip_client_init(*new RGWKMIPManagerImpl(dpp->get_cct()));
} /* init_http_clients */
其中的rgw_http_client_init:
1
2
3
4
5
6
7
// ceph-v19.2.2/src/rgw/rgw_http_client.cc
void rgw_http_client_init(CephContext *cct)
{
  curl_global_init(CURL_GLOBAL_ALL);
  rgw_http_manager = new RGWHTTPManager(cct);
  rgw_http_manager->start();
}
来看下RGWHTTPManager类的几个关键处理,其中包含了 async异步处理框架,RGWCompletionManager中则基于 协程实现,后续进行详细梳理,本篇暂不展开。
1
2
3
4
5
6
7
8
9
10
11
12
13
14
15
16
17
18
19
20
21
22
23
// ceph-v19.2.2/src/rgw/rgw_http_client.h
class RGWHTTPManager {
  ...
  CephContext *cct;
  // 完成的io请求管理类,其中基于协程实现
  RGWCompletionManager *completion_mgr;
  ...
  // start()中会创建线程,并由该指针指向线程
  ReqsThread *reqs_thread = nullptr;
  ...
public:
  RGWHTTPManager(CephContext *_cct, RGWCompletionManager *completion_mgr = NULL);
  ~RGWHTTPManager();

  // 启动管理类,其中会创建线程
  int start();
  void stop();

  // 对外接口,向本类新增客户端请求
  int add_request(RGWHTTPClient *client);
  int remove_request(RGWHTTPClient *client);
  int set_request_state(RGWHTTPClient *client, RGWHTTPRequestSetState state);
};
3.3. RADOS前端初始化
main流程中的main.init_frontends1 和 main.init_frontends2 负责RADOS前端(负责处理客户端请求)的初始化。前者只进行相关配置,后者进行监听等具体逻辑。
init_frontends2是AppMain类的成员函数,main函数中调用时传参为nullptr:r = main.init_frontends2(nullptr /* RGWLib */);。
来看下init_frontends2的简要流程:
1
2
3
4
5
6
7
8
9
10
11
12
13
14
15
16
17
18
19
20
21
22
23
24
25
26
27
28
29
30
31
32
33
34
35
36
37
38
39
40
41
42
43
44
45
46
47
48
49
50
51
52
53
54
// ceph-v19.2.2/src/rgw/rgw_appmain.cc
int rgw::AppMain::init_frontends2(RGWLib* rgwlib)
{
  ...
  // 可能支持多个前端,对每个前端配置进行初始化
  std::map<std::string, std::unique_ptr<RGWFrontendConfig> > fe_def_map;
  for (auto& f : frontends_def) {
    RGWFrontendConfig *config = new RGWFrontendConfig(f);
    int r = config->init();
    ...
  }
  ...
  // 对AppMain类的`RGWREST rest;`成员注册客户自定义头
  rest.register_x_headers(g_conf()->rgw_log_http_headers);
  // 初始化调度上下文、限流器
  sched_ctx.reset(new rgw::dmclock::SchedulerCtx{dpp->get_cct()});
  ratelimiter.reset(new ActiveRateLimiter{dpp->get_cct()});
  ratelimiter->start();
  ...
  int fe_count = 0;
  for (multimap<string, RGWFrontendConfig *>::iterator fiter = fe_map.begin();
       fiter != fe_map.end(); ++fiter, ++fe_count) {
    RGWFrontendConfig *config = fiter->second;
    string framework = config->get_framework();
    ...
    RGWFrontend* fe = nullptr;
    // 针对不同前端对应的框架,分别进行不同的实例化
    if (framework == "loadgen") {
        fe = new RGWLoadGenFrontend(env, config);
    }
    else if (framework == "beast") {
      need_context_pool();
      fe = new RGWAsioFrontend(env, config, *sched_ctx, *context_pool);
    }
    else if (framework == "rgw-nfs") {
      fe = new RGWLibFrontend(env, config);
      if (rgwlib) {
        rgwlib->set_fe(static_cast<RGWLibFrontend*>(fe));
      }
    }
    ...
    dout(0) << "starting handler: " << fiter->first << dendl;
    // 前端处理类初始化
    int r = fe->init();
    if (r < 0) {
      derr << "ERROR: failed initializing frontend" << dendl;
      return -r;
    }
    // 前端处理类启动
    r = fe->run();
    ...
  }
  ...
}
当前Ceph版本(19.2.2)中,默认前端是beast,下面是rgw.yaml.in配置文件中对rgw前端的说明。默认beast,端口7480。
1
2
3
4
5
6
7
8
9
10
11
12
13
14
15
16
17
18
19
20
21
22
23
24
25
# ceph-v19.2.2/src/common/options/rgw.yaml.in
- name: rgw_frontends
  type: str
  level: basic
  desc: RGW frontends configuration
  long_desc: A comma delimited list of frontends configuration. Each configuration
    contains the type of the frontend followed by an optional space delimited set
    of key=value config parameters.
  fmt_desc: Configures the HTTP frontend(s). The configuration for multiple
    frontends can be provided in a comma-delimited list. Each frontend
    configuration may include a list of options separated by spaces,
    where each option is in the form "key=value" or "key". See
    `HTTP Frontends`_ for more on supported options.
  default: beast port=7480
  services:
  - rgw
  with_legacy: true
- name: rgw_frontend_defaults
  type: str
  level: advanced
  desc: RGW frontends default configuration
  long_desc: A comma delimited list of default frontends configuration.
  default: beast ssl_certificate=config://rgw/cert/$realm/$zone.crt ssl_private_key=config://rgw/cert/$realm/$zone.key
  services:
  - rgw
3.4. beast前端:RGWAsioFrontend
上节可知rgw默认的前端处理类为:RGWAsioFrontend。
1
2
3
4
5
6
7
8
9
10
11
12
13
14
15
16
17
18
// ceph-v19.2.2/src/rgw/rgw_asio_frontend.h
class RGWAsioFrontend : public RGWFrontend {
  class Impl;
  std::unique_ptr<Impl> impl;
public:
  RGWAsioFrontend(RGWProcessEnv& env, RGWFrontendConfig* conf,
		  rgw::dmclock::SchedulerCtx& sched_ctx,
		  boost::asio::io_context& io_context);
  ~RGWAsioFrontend() override;

  int init() override;
  int run() override;
  void stop() override;
  void join() override;

  void pause_for_new_config() override;
  void unpause_with_new_config() override;
};
头文件中隐藏了实现细节,都在内部实现类Impl中,从对应的源文件可看到,实际还是基于父类AsioFrontend的实现。
1
2
3
4
5
6
7
8
// ceph-v19.2.2/src/rgw/rgw_asio_frontend.cc
class RGWAsioFrontend::Impl : public AsioFrontend {
 public:
  Impl(RGWProcessEnv& env, RGWFrontendConfig* conf,
       rgw::dmclock::SchedulerCtx& sched_ctx,
       boost::asio::io_context& context)
    : AsioFrontend(env, conf, sched_ctx, context) {}
};
此处简单分析init,其他接口详情后续实际使用时再跟踪代码。可看到init负责对配置中的端口和地址进行监听,并起协程进行循环accept处理。
1
2
3
4
5
6
7
8
9
10
11
12
13
14
15
16
17
18
19
20
21
22
23
24
25
26
27
28
29
30
31
32
33
34
35
36
37
38
39
40
41
42
// ceph-v19.2.2/src/rgw/rgw_asio_frontend.cc
int AsioFrontend::init()
{
  boost::system::error_code ec;
  auto& config = conf->get_config_map();
  ...
  auto ports = config.equal_range("port");
  // 可能监听多个端口
  for (auto i = ports.first; i != ports.second; ++i) {
    auto port = parse_port(i->second.c_str(), ec);
    ...
    listeners.back().endpoint.port(port);
  }
  // 可能多个endpoints
  auto endpoints = config.equal_range("endpoint");
  for (auto i = endpoints.first; i != endpoints.second; ++i) {
    ...
    listeners.back().endpoint = endpoint;
  }
  // 是否禁用nagle
  auto nodelay = config.find("tcp_nodelay");
  ...
  // 开始监听
  for (auto& l : listeners) {
    l.acceptor.open(l.endpoint.protocol(), ec);
    ...
    l.acceptor.set_option(tcp::acceptor::reuse_address(true));
    l.acceptor.bind(l.endpoint, ec);
    ...
    l.acceptor.listen(max_connection_backlog);
    // 创建协程,用于处理循环accept
    boost::asio::spawn(context,
      [this, &l] (boost::asio::yield_context yield) mutable {
        accept(l, yield);
      }, bind_cancellation_slot(l.signal.slot(),
             bind_executor(context, boost::asio::detached)));

    ldout(ctx(), 4) << "frontend listening on " << l.endpoint << dendl;
    socket_bound = true;
  }
  ...
}
4. 小结
梳理Ceph对象存储,简单跟踪main函数流程。